
Advanced audio: microphone effects and mixed output
Once Advanced Streaming Mode is set up, you can:
- Automatically switch to your singing Profile when a backing track starts
- Automatically switch back to your chatting Profile when the song ends
- Mix backing tracks, BGM and your processed microphone, then send the mix to OBS or Discord
Send audio to OBS
For OBS alone, start with the dedicated audio plug-in; no virtual cable is required. Complete these four steps first, then configure the default singing Profile below.
Enable Advanced Streaming Mode and choose the microphone
Open Settings → Audio Routing and select Advanced Streaming Mode (mix output). Prefer the manufacturer ASIO driver when you have an audio interface; otherwise choose Windows Audio, then select the microphone you use. Done: the Microphone Input meter moves when you speak.
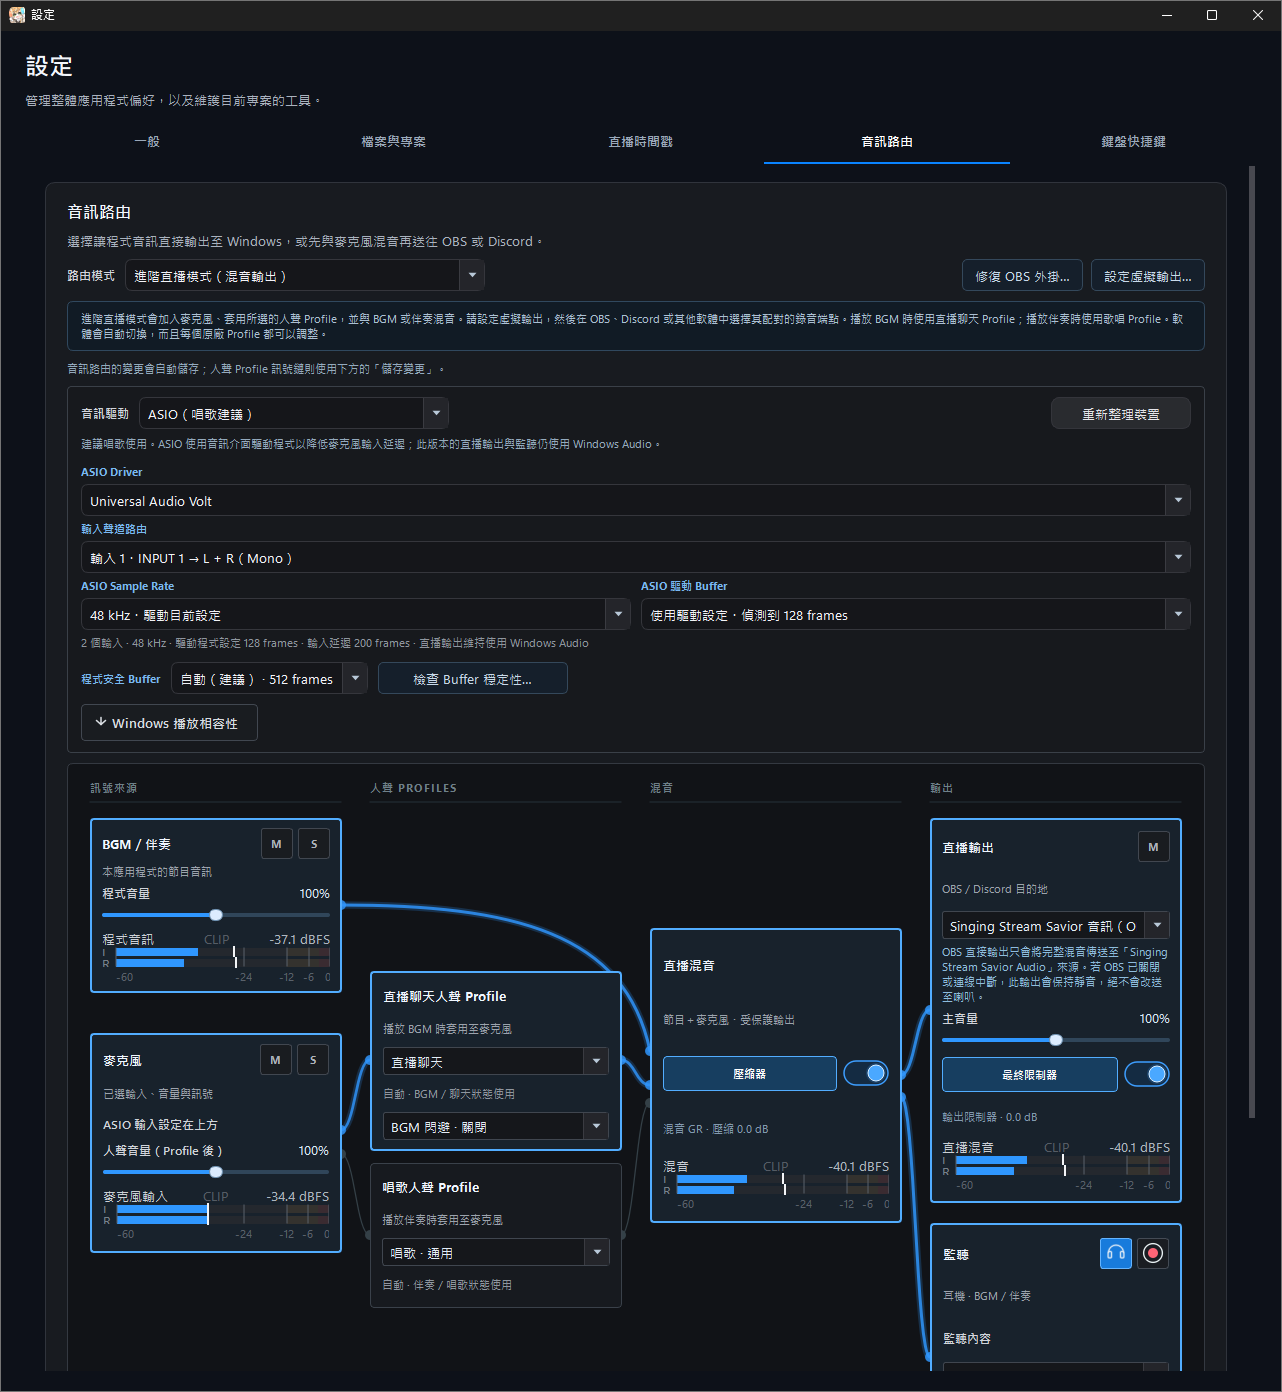
Select the OBS plug-in output
In Settings → Audio Routing select Install / repair OBS plug-in, choose your OBS installation, and restart OBS afterwards. Set Stream Output to Singing Stream Savior Audio (OBS Plugin). Select real headphones or your audio interface separately for Monitor.
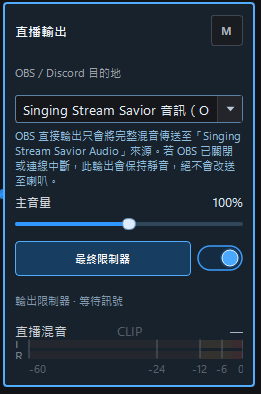
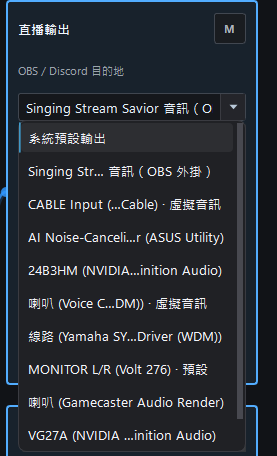
Add the dedicated source in OBS
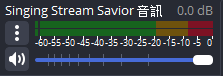
Select the plus button under OBS Sources and choose Singing Stream Savior Audio. This is not a normal Audio Input Capture. If it is missing, confirm that the plug-in is installed and restart OBS. When using the complete Stream Output, disable duplicate raw-microphone or desktop-accompaniment sources in OBS. Keeping both can double the voice, raise the level, or create phasey sound.
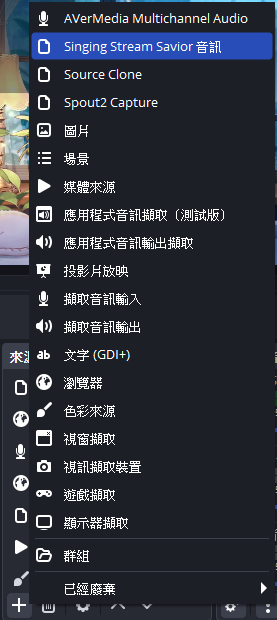
Check vocals, accompaniment and effects
Play accompaniment and speak or sing. Check the dedicated OBS meter, then record and replay a short clip to check vocals, music, effects and balance. A moving meter alone is insufficient; check for duplicated voice or echo too.
Alternative OBS route and plug-in details (expand if needed)
OBS DIRECT OUTPUT
Use the OBS audio plug-in or a virtual device
Both routes carry the same Stream Output after the Profile, Mix Bus, and final limiter.
The existing Install OBS Plug-in menu covers standard OBS, a Portable OBS folder, and removal. A successful install automatically selects Singing Stream Savior Audio (OBS Plugin); restart OBS and add the source with the same name to receive the signal.
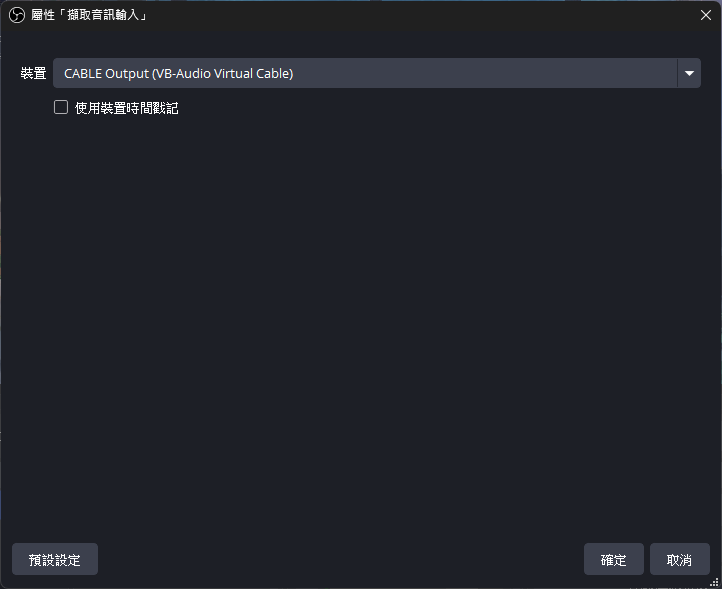
With VB-CABLE, select CABLE Input in Singing Stream Savior and CABLE Output in an OBS Audio Input Capture. Disable any duplicate raw-microphone source to avoid doubled vocals.
Select a virtual audio output
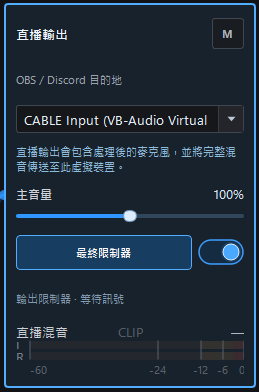
If another app also needs the complete mix, select the playback side of a virtual audio device in Singing Stream Savior. With VB-CABLE, this is CABLE Input. Keep Monitor Device on physical headphones or your audio interface.
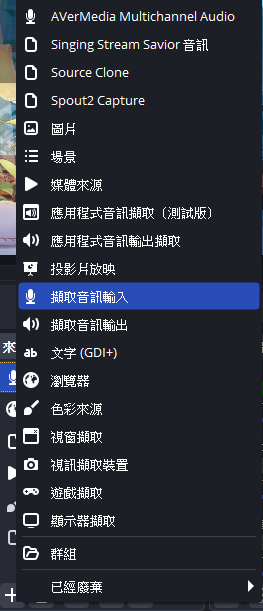
Add Audio Input Capture in OBS
Select the plus button under OBS Sources, choose Audio Input Capture, and set Device to the recording side of the virtual cable. With VB-CABLE, this is CABLE Output.
Confirm the virtual-device signal
Play accompaniment and add vocal input. Confirm a stable Audio Input Capture level in the OBS mixer, then make a short recording to check stereo centering, balance, and lip sync.
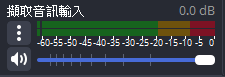
Send audio to Discord or another calling app
Use a virtual device such as VB-CABLE to present the finished mix as a calling app’s microphone input. OBS does not need to be open: Singing Stream Savior sends to CABLE Input and Discord receives CABLE Output.
Prepare a virtual audio device
Skip this if CABLE Input / Output are available. Otherwise download VB-CABLE from VB-Audio, fully extract it, run the installer matching your computer architecture as administrator, and restart Windows. Installation screenshots are below; restarting only the app is not a substitute.
Enable Advanced mode and send to CABLE Input
In Settings → Audio Routing enable Advanced Streaming Mode, select your actual microphone, and set Stream Output to CABLE Input. Keep App Buffer on the recommended automatic setting initially and Monitor on real headphones or an interface. Do not select CABLE Output as this app’s microphone input: it would feed the mix back into itself.
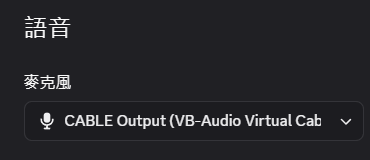
Select the virtual device's recording endpoint as Discord input
In Discord Voice settings, set the microphone/input device to the recording side of the virtual device. With VB-CABLE, Singing Stream Savior sends to CABLE Input and Discord must select CABLE Output. Set Discord’s output device to real headphones, not CABLE Input, so callers do not hear their own voices returned. In another calling app, likewise select CABLE Output as its microphone/input device.
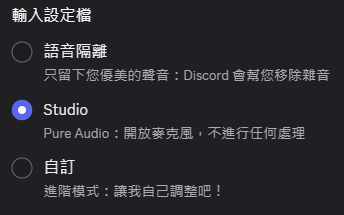
Prevent voice processing from cutting the music
If your Discord version offers Studio (Pure Audio), start there; the screenshot shows the author’s version. Otherwise adjust unnecessary voice isolation, noise suppression and automatic gain, and check voice-activity thresholds or Push to Talk. Verify the result with audio actually received in the call.
Check vocals, accompaniment and effects
Play accompaniment and speak or sing. Check Stream Output and Discord’s input meter, then ask another person in the call to confirm vocals, music and reverb. If music cuts out, check suppression and input mode. If there is echo, check duplicate paths and whether call output is fed back into the cable.
Discord may still re-encode, compress, or otherwise process call audio, so it can sound worse than a local recording or OBS capture even when routing is correct. Use OBS or local recording when preserving the highest quality matters.
VB-CABLE installation screenshots (expand if needed)
The virtual audio cable is a separate Windows driver. Singing Stream Savior never downloads, runs, or changes the driver for you. Install it only from its official vendor.
A Windows restart is required. VB-Audio’s official instructions require a restart after installation. Restarting Singing Stream Savior or refreshing its device list is not a substitute for restarting Windows.
Install VB-CABLE
These steps cover a typical 64-bit Windows 10/11 PC. For Windows on ARM or another architecture, follow VB-Audio’s official package instructions.
Open the official VB-Audio download page
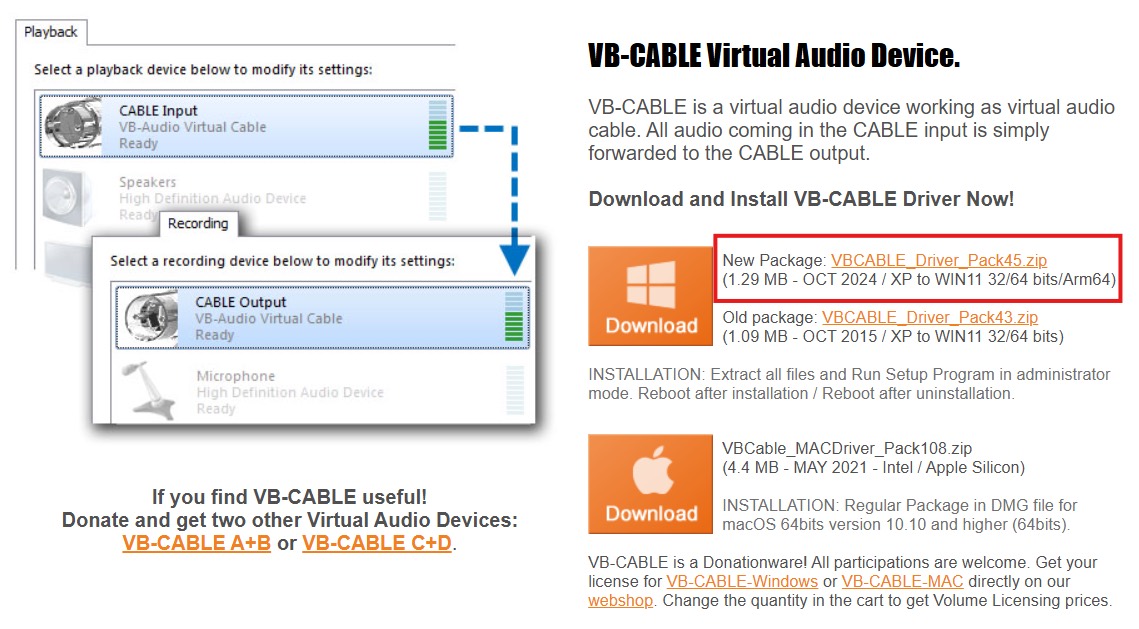
Download the current Windows package
Under the Windows section of the official page, select New Package. Do not download an audio driver from a third-party mirror.
Extract the complete ZIP
Choose Extract all for the downloaded ZIP, then open the extracted folder. Do not run Setup from the ZIP preview; that can cause a missing INF or corrupted driver-package error.

Run the 64-bit setup as administrator
On a normal 64-bit Windows PC, right-click VBCABLE_Setup_x64.exe and choose Run as administrator. Use the file without _x64 only on 32-bit Windows.
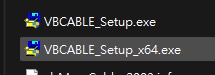
_x64.Install the driver
When Windows asks for permission, verify the publisher, then select Install Driver. Wait for the process to finish; do not repeatedly press the button or force-close the window.
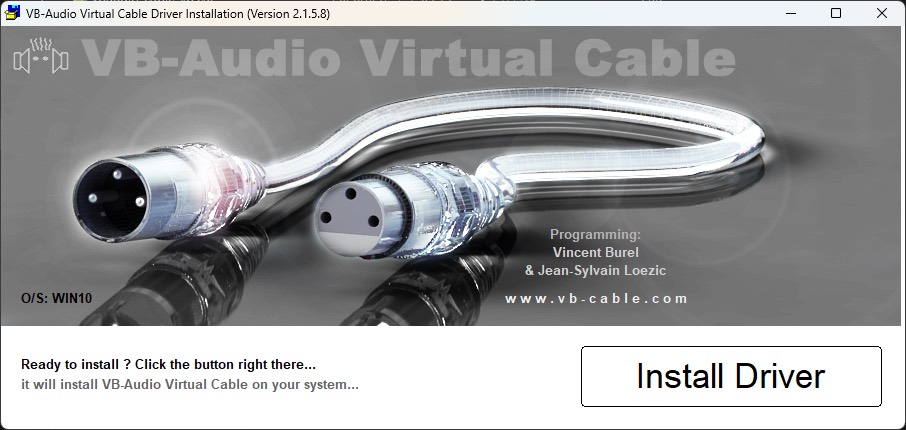
Restart Windows after success
After Installation Complete and Successful appears, acknowledge the message, save your work, and restart the computer. Continue with Singing Stream Savior, OBS, or Discord only after the restart.
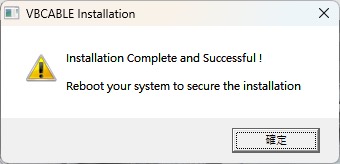
Connect Singing Stream Savior after restarting
- Open Settings → Audio Routing and select Advanced Streaming Mode (Mixed Output).
- Select Set up virtual output…, then Refresh devices.
- Set Stream Output to VB-CABLE’s playback endpoint, normally CABLE Input.
- Set Monitor Output to physical headphones or your audio interface. Do not select the same CABLE Input.
- In OBS, add Audio Input Capture and select VB-CABLE’s recording endpoint, normally CABLE Output. In Discord, select the same CABLE Output as the input device.
- Play a test song and speak. Confirm activity in Singing Stream Savior’s Stream Mix and in OBS/Discord, without duplicated voice or feedback.
If OBS already captures the raw microphone directly, disable that duplicate source when using the complete Stream Mix. Otherwise the voice may be doubled, louder, or phasey.
CABLE Input or Output is missing
- Confirm that Windows was actually restarted after installation.
- Confirm that Setup was run as administrator from the fully extracted folder.
- Select Refresh devices in Singing Stream Savior’s Virtual Output Setup.
- Close apps that may be holding audio devices. If it is still missing, use the official VB-Audio reference manual.
VB-CABLE names, interfaces, and installers are products of VB-Audio Software. Screenshots are included only to explain the installation steps.
2.1.0.0 · AUDIO ROUTING
Normal Playback versus Advanced Streaming Mode
Begin in Settings → Audio Routing. Normal Playback outputs the app's BGM and accompaniment only. Advanced Streaming Mode adds the microphone, Profile effect chains, complete mix, and virtual output.
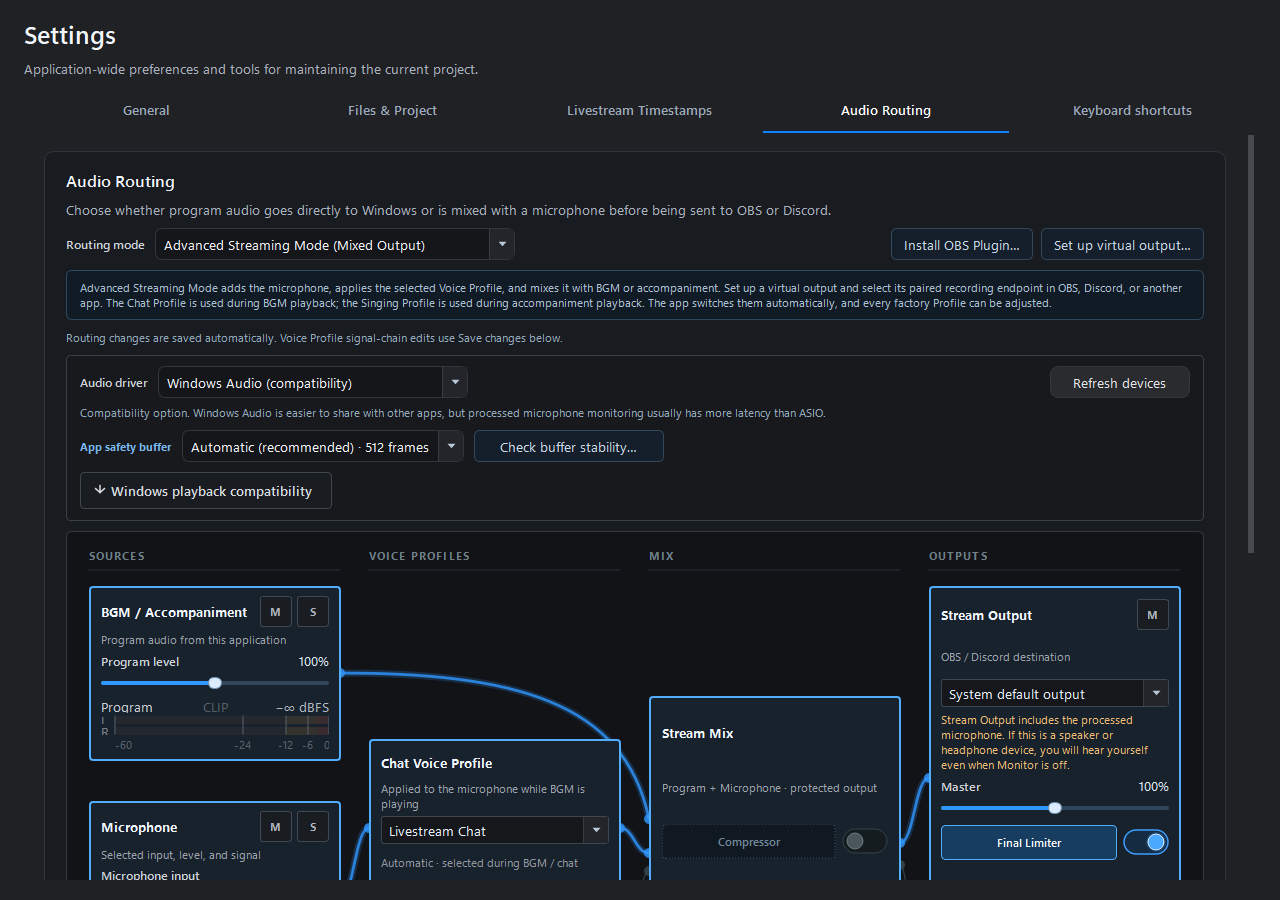
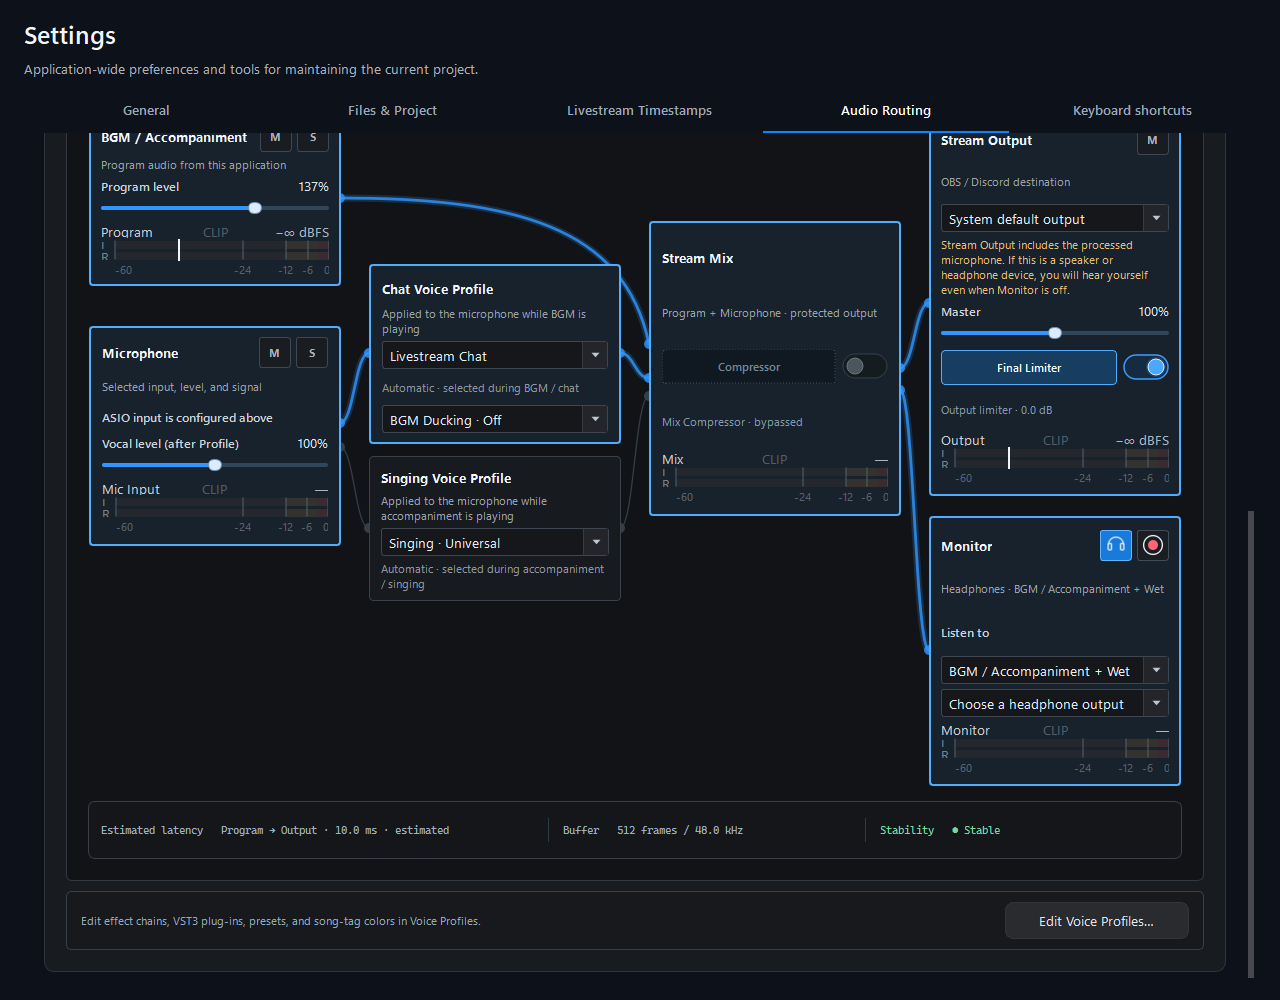
Normal Playback retains BGM/accompaniment playback and lyric/set-list features. Advanced mode also processes the microphone and creates the mix. A vocal Profile processes the microphone, not accompaniment through the same chain. Monitor is your listening path; OBS/Discord receive Stream Output.
Microphone → Profile effect chain → Mix with BGM/accompaniment → Stream Output → OBS / Discord
Default singing Profile and automatic switching
Choose singing and chat defaults in Settings → Audio Routing; you do not need to tag every song. Then confirm the main Profile menu uses automatic switching rather than a fixed manual Profile.
Set the default Chat and Singing Profiles
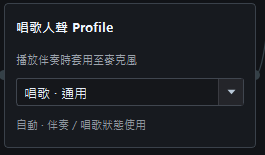
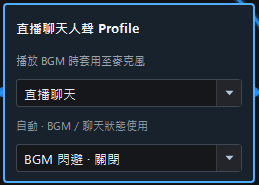
Singing Voice Profile is the accompaniment default. Live Chat Voice Profile is used for BGM and talking, and its lower option controls automatic BGM ducking. Done: without a song tag, starting and stopping accompaniment switches between these two defaults automatically.
Return the main Profile menu to automatic switching
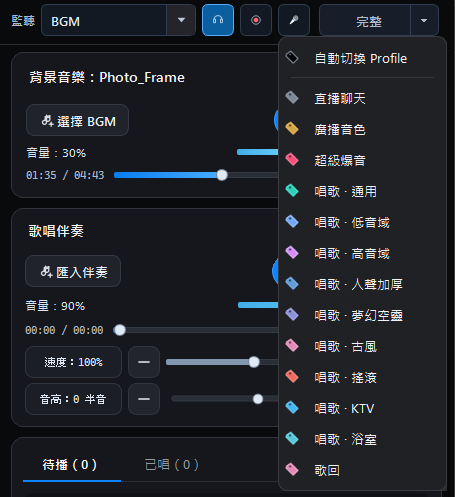
Choose Automatically switch Profile in the top Profile menu. Untagged songs or Automatic · Singing Profile use the default from Audio Routing. An explicitly assigned song Profile takes priority. A manually selected Profile overrides automation until you return to automatic switching.
Check vocals, accompaniment and effects
Start accompaniment to confirm the singing Profile, then stop and return to chat to confirm the chat Profile. Verify the received effects with a short OBS recording, Full Output recording, or a Discord call. Check manual override and song tags first if switching does not happen.
Open Profile settings (streaming effects) →
Devices, monitoring, recording and stability reference
After output and automatic switching work, use the following reference as needed. Before first serious use, run a stability check while no stream, call or external recording is active; it need not be repeated before every stream.
Default Profiles and BGM Ducking
- Chat Voice Profile is selected automatically during BGM playback or livestream chat.
- Singing Voice Profile is the default while accompaniment is playing; a song’s Profile tag can override it. The microphone button’s right-click menu can hold a temporary manual Profile. Choose Automatically switch Profile to resume chat/singing and song-tag automation.
- BGM Ducking · Automatic lowers only BGM while microphone voice is detected, by no more than 9 dB, and never boosts the microphone. It is bypassed automatically during singing accompaniment so the track does not pump with every phrase; the Mix Bus Compressor handles overall glue there. Choose Off to disable automatic BGM reduction.
Recommended starting point for most users
The simplest starting point is ASIO when an interface provides it, App Safety Buffer set to Automatic (Recommended) · 512 frames, and the dedicated OBS audio source. You do not need to manually try every buffer first.
- Prefer the interface vendor’s ASIO driver. Keep the interface hardware buffer at an already-stable value—commonly 128 or 256 frames. It is separate from the App Buffer.
- Without ASIO, choose Windows Audio and leave the App Buffer on automatic 512. Do not force 128 or 256 as the first step.
- Run Full Check only when you want lower software Dry monitoring latency; apply 256 only when the check recommends it. Prefer the interface’s Direct Monitor for primary singing monitoring.
- Prefer the dedicated Singing Stream Savior source in OBS. Use a virtual cable only when another application also needs the complete Mix.
- Run Full Check and apply its recommendation at least once after the initial route setup; you do not need to repeat it before every stream. Run it again only after device/driver or major Profile/VST3/routing changes, a yellow state, or an audible dropout.
Advanced diagnostics: App Buffer checks and yellow states (expand if needed)
App-buffer health check and yellow status
The App safety buffer selector and Check buffer stability… button stay together in one visible row. With ASIO input, the row appears directly below the ASIO sample-rate/hardware-buffer panel; it remains available while the advanced Windows playback compatibility section is collapsed. Quick check tests 512 and 1024 frames in about 25 seconds. Full check tests 128, 256, 512, and 1024 frames in about five minutes. It diagnoses the app buffer without changing the audio interface’s separate ASIO hardware buffer, and its recommendation can be applied directly. A low value such as 128 or 256 is treated as verified only after both independent strict observations in Full check pass for the current devices, Profile, effects, and route.
The health check does not play a synthetic test tone or accompaniment. If software monitoring is enabled, you may still hear the live microphone, and each route restart can cause a brief interruption. After you confirm, Singing Stream Savior automatically stops BGM and accompaniment playing inside the app. It cannot stop OBS streaming, Discord calls, or external recording, so stop those yourself first. The audio interface’s Direct Monitor is unaffected.
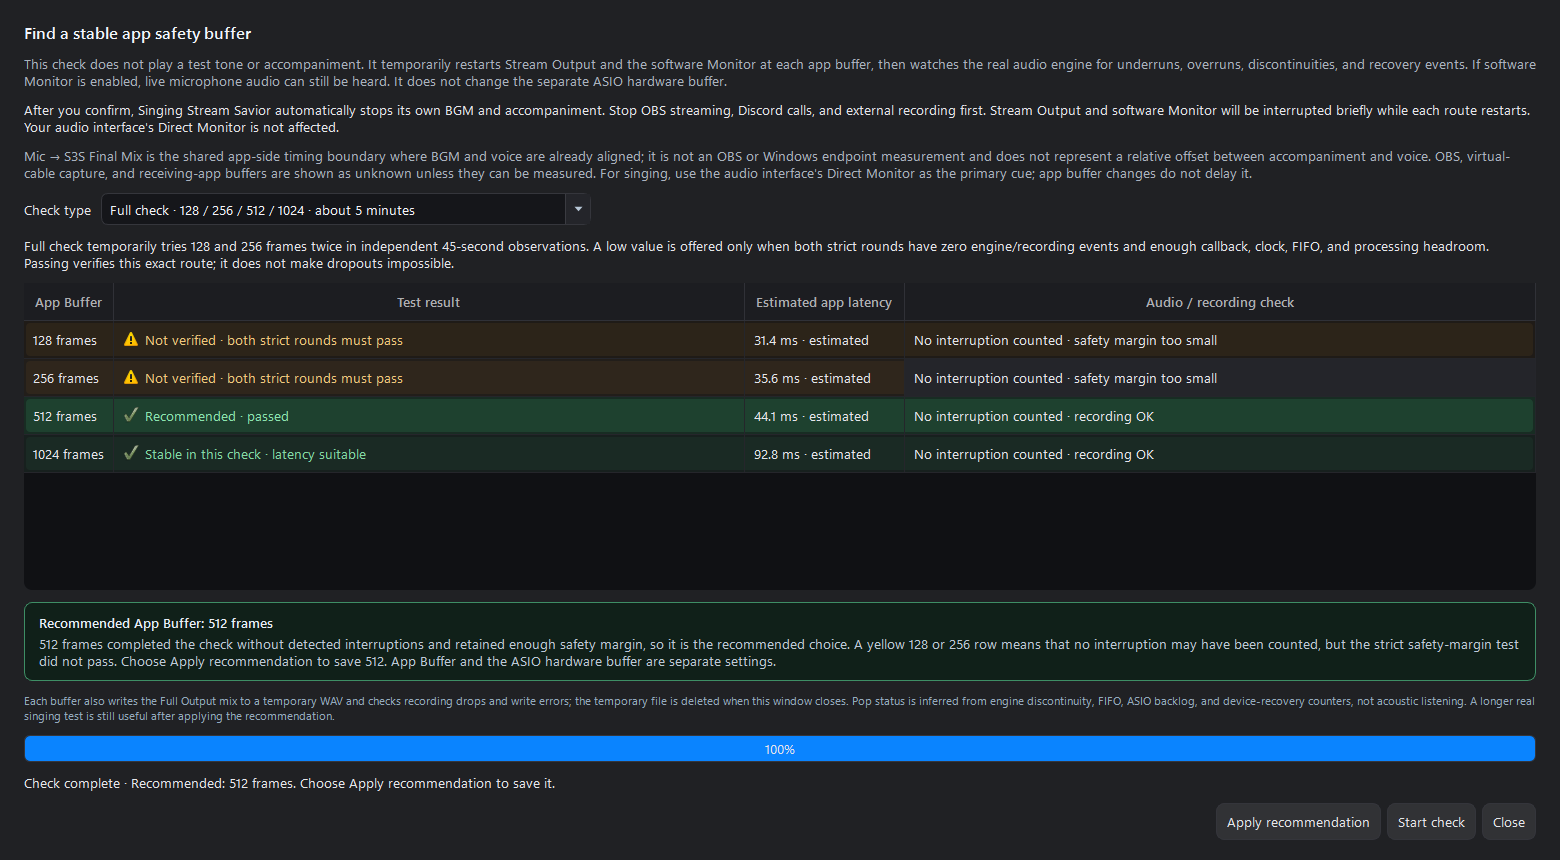
Is “Not verified” normal for 128 or 256? Yes. A low Buffer must pass repeated stability checks before it is recommended; “Not verified” does not mean an audible dropout has already occurred. Use the recommended 512 unless you specifically need lower software-monitor latency. App Buffer and the interface’s ASIO hardware buffer are separate settings.
The yellow messages have two meanings. Check dropouts means the microphone, monitoring, stream output, or a recovering device may be unstable. Check audio timing means processing time or synchronization has remained abnormal. A brief spike does not always mean an audible dropout occurred; hover over Stability for details.
MONITOR & RECORD
Choose what you monitor and record the mix
The headphones button controls monitoring. Listen to BGM/accompaniment, the full mix, wet or dry microphone combinations, or the processed microphone alone. Recording can capture the full output or monitored content as WAV 16-bit PCM, WAV 24-bit PCM, or WAV 32-bit Float.
Avoid feedback: use headphones when microphone monitoring is enabled, not speakers that feed back into the mic. Make a short test recording before a live stream to check voice, accompaniment, levels, and latency.
- WAV 16-bit PCM is the smallest and most compatible; WAV 24-bit PCM is the recommended balance for normal recording and editing; WAV 32-bit Float keeps the most post-production headroom but creates the largest files.
Monitoring and recording do not rewrite Profile tone
Monitoring is a separate headphone path. Dry Cue uses an independent software capture to reduce dry-vocal monitoring latency where possible; it does not change the formal Mix, OBS, or recording path. For the lowest singing-monitor latency, prefer the audio interface’s hardware Direct Monitor. The Meter’s BGM/accompaniment-monitor and vocal-monitor knobs run from 0–200% and change only the performer’s balance—not the audience Stream Output or any Compressor, EQ, or other Profile parameter. Full Output recording follows the formal Stream Output timeline, so BGM/accompaniment and Vocal share that timeline; Dry Cue or other software-monitor latency does not shift their relative offset in the recording. Record Monitored Content when you specifically want to inspect the headphone balance.
METER & HEALTH
Inspect six audio paths and system load
Advanced Streaming Mode exposes the Meter through View or the tray menu. It can dock on the right, float independently, and switch between horizontal and vertical layouts with one split button.
The six tracks appear in this order: BGM / accompaniment, Vocal (after Profile, before Mix), BGM / accompaniment monitor, Vocal monitor, Guide vocal Monitor, and Master / Stream Output. Every track shows Peak; Master / Stream Output also shows three-second short-term LUFS-S. All gains run from 0–200% except Guide vocal Monitor at 0–100%; guide vocal is monitor-only and never enters Stream or OBS.
The horizontal Meter can suggest raising Vocal or lowering BGM/accompaniment after a sustained imbalance. It is advisory only and never changes gain automatically. Silence, breaths, and instrumental sections are not immediately treated as a quiet vocal.
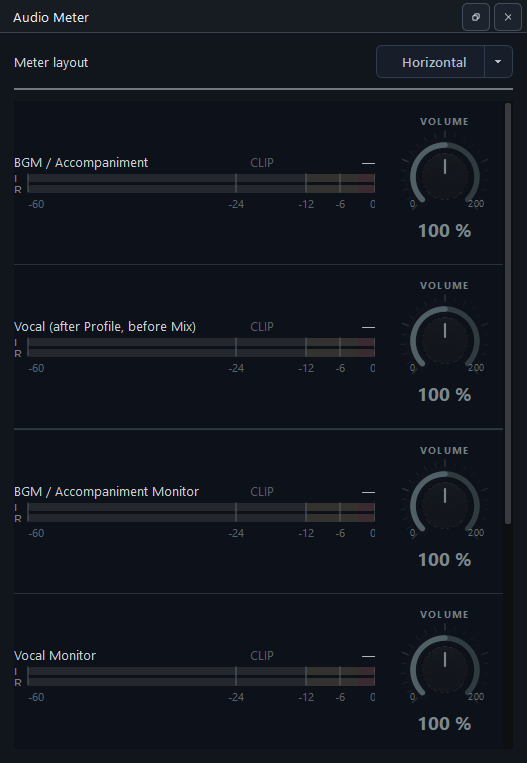
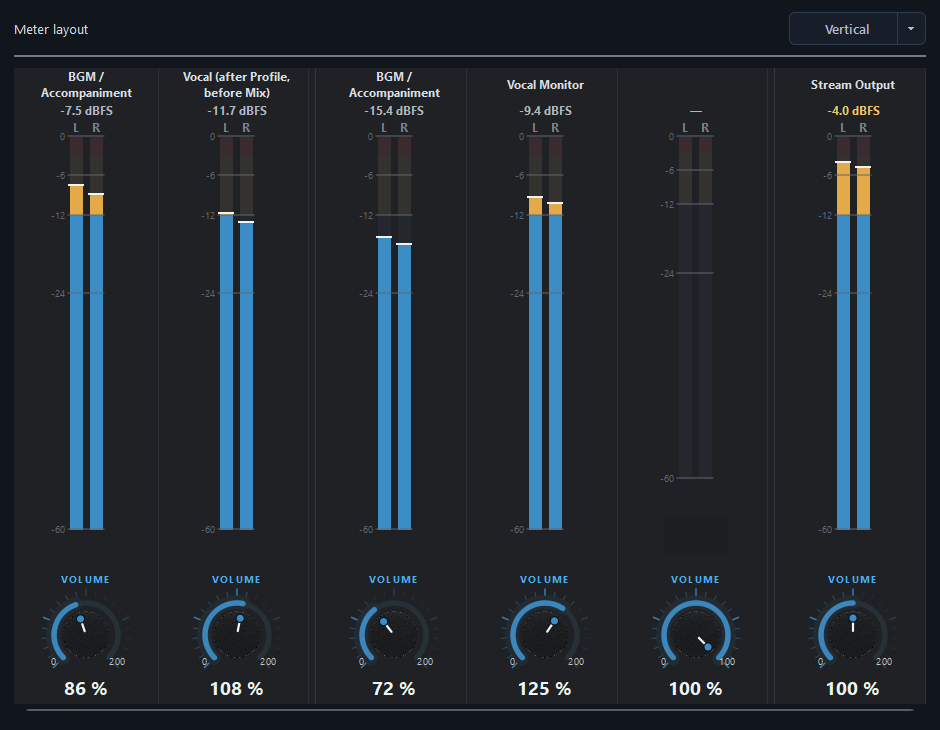
When does loudness advice appear?Only after enough accompaniment and vocal activity
The app observes a sustained section of accompaniment and vocal before comparing their balance. Advice is delayed at the beginning of a song, during silence, breaths, interludes, Profile changes, or audio-device recovery. If Vocal is already close to overload, the app only suggests lowering the accompaniment instead of raising Vocal. Changing tracks, stopping, restarting, or making a large seek starts a fresh observation.
Advanced diagnostics: CPU, RAM, and audio health
The CPU/RAM status shows this app's resource use. Hover over it for detailed system and app usage; Advanced Streaming Mode also shows the Buffer, processing time, estimated latency, and audio-interruption counts. Colors warn when load may affect stability.

How to read the CPU, RAM, and audio-health tooltip
The lower-right status updates every two seconds. Its compact CPU/RAM values belong to Singing Stream Savior; hover to see whole-system load, process memory, and Advanced-mode audio data. One number alone does not prove an audible dropout—read the state together with timing headroom and counters that continue to rise.
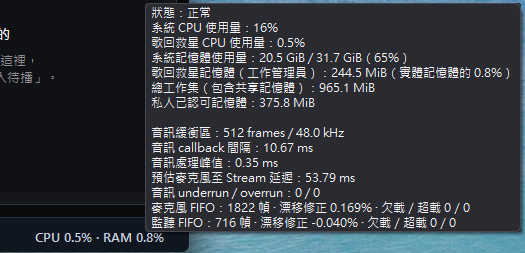
| Field | What it means | How to judge it |
|---|---|---|
| Status, system CPU, and app CPU | System CPU is total PC load; Singing Stream Savior CPU is this process. Status combines CPU, RAM, audio interruptions, and device recovery. | Color changes require two consecutive samples. System CPU warns/goes critical at 85%/95%; app CPU at 25%/50%. A brief spike that clears usually does not require an immediate setting change. |
| System memory, Task Manager memory, working set, and private commit | System memory is total used RAM. Task Manager memory is the process private working set, and the compact RAM% is that value divided by physical RAM. Total working set includes shared mappings; private committed memory is not necessarily all resident in RAM. | Warning/critical thresholds are 85%/95% system memory or 15%/30% of physical RAM for displayed app memory. A larger total working set alone is not evidence of a leak. |
| Audio buffer and callback interval | Buffer frames ÷ sample rate is the time budget for each callback; 512 ÷ 48,000 is about 10.67 ms. | A larger buffer usually adds stability but delays software monitoring. This is the App Buffer, not the interface ASIO hardware buffer, and it does not delay hardware Direct Monitor. |
| Audio processing peak | The highest callback processing time seen by the current audio engine. It is a high-water mark, not a two-second average CPU reading. | It should stay comfortably below the callback interval. A newly observed peak at 85% or more of the period raises an audio warning. The shown 0.35 ms is only about 3.3% of 10.67 ms. An old peak remaining visible does not mean sustained overload. |
| Estimated microphone-to-Stream latency | A graph-based estimate from the microphone through the active route, buffers, and effect latency to formal Stream Output. | It is not a complete analog-ADC-to-camera-lip measurement and is not accompaniment-to-vocal offset. The formal Mix first places both on one timeline; verify camera lip sync with a short OBS recording. |
| Audio underruns/overruns | An underrun means the consumer needed audio before enough queued data was available, which can insert silence or a discontinuity. An overrun means the queue filled and data may be dropped. Counts accumulate for the current engine run. | Zero/zero after stable playback is ideal. Device priming has a six-second startup display grace, but rising counts during playback, audible pops, or a yellow state require attention. |
| Microphone/Monitor FIFO, drift correction, and path counters | FIFO frames are queued samples at that instant. Drift correction is a small rate adjustment between device clocks; a small non-zero value is common with ASIO input and Windows output. | FIFO size or small drift alone is not a fault. Look for zero path underruns/overruns, Normal status, and clean audio. Investigate the buffer, driver, and device when counts rise or a timing warning persists. |
What to do when the status turns yellow or red
- Identify the warning source and see whether underrun/overrun counters rise during stable playback. An old processing peak with unchanged counters is not enough to declare a stream dropout.
- Stop recording/streaming and run Buffer Health Check. If 256 is unstable, return to automatic 512; if 512 still accumulates events, test 1024. Stable output matters more than a few milliseconds of software-monitor latency.
- Near CPU limits, close unnecessary apps and reduce heavy VST3/effect load. Near 85% system memory, close other applications consuming whole-system RAM.
- For an interrupted, recovering, or recovery-exhausted device, check USB, the driver, and sample rate, then refresh devices. Make a short pre-stream recording to verify centering, balance, dropouts, and lip sync.
The screenshot reads Normal: 16% system CPU, 0.5% app CPU, 65% system memory, 0.8% app private working set, a processing peak using only about 3.3% of the callback budget, and zero microphone/Monitor underruns and overruns. The FIFO values and small drift corrections need no action by themselves.
TRAY & SHORTCUTS
Keep control after minimizing to the system tray
A setting chooses whether the main-window close button minimizes to the tray or exits. When the app stays in the background, common live controls remain available without reopening the workspace.
The state-aware menu includes play/resume, pause, stop, restart from the beginning, Key, speed, Profile, microphone mute/restore, Lyrics Window, Open Main Window, and—only in Advanced Streaming Mode—the Meter. **Exit Application** closes the app and its playback features.
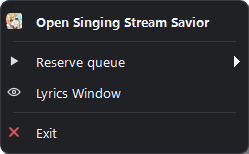
Global shortcuts are grouped into Playback Controls and Microphone/Monitoring, include defaults, and hide Advanced-only actions in Normal Playback Mode.
Default global shortcutsAll assignments can be changed or cleared in Settings
While Singing Stream Savior is running, registered shortcuts work even when OBS or another app has focus and when the main window is hidden in the notification area. A conflict is rejected without replacing the shortcut that already works. Microphone, Monitor, and effect Switch actions are available only in Advanced Streaming Mode.
| Function | Default |
|---|---|
| Mute / restore microphone | Ctrl+Alt+M |
| Turn the selected Monitor source on / off | Ctrl+Alt+H |
| Switch active-Profile Shimmer for this song | Ctrl+Alt+E |
| Switch active-Profile Doubler for this song | Ctrl+Alt+D |
| Switch active-Profile Harmony for this song | Ctrl+Alt+Y |
| Play / pause accompaniment or play the first Reserve item | Media Play/Pause |
| Stop accompaniment | Media Stop |
| Restart current accompaniment | Ctrl+Alt+R |
| Open / close the lyrics window | Ctrl+Alt+L |
| Key −1 / +1 semitone | Ctrl+Alt+Down / Ctrl+Alt+Up |
| Restore original Key | Ctrl+Alt+K |
| Speed −5% / +5% | Ctrl+Alt+Left / Ctrl+Alt+Right |
| Restore 100% speed | Ctrl+Alt+S |
Shimmer, Doubler, and Harmony shortcuts change only the current song's temporary Switch state. They do not change Block Bypass or the Profile's saved default.
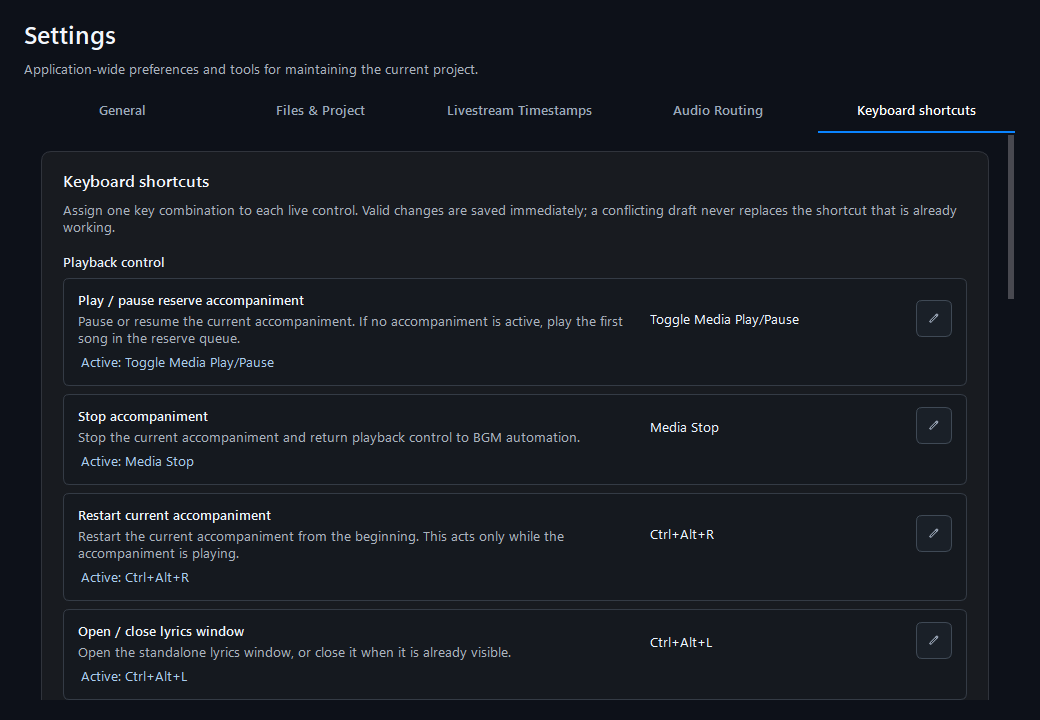
Detailed effects are now in the separate Profile chapter. Open Profile settings (streaming effects) →
Settings moved in 2.1.0.0
- YouTube downloads moved to Settings → Files & Projects, together with project and media-folder controls.
- Advanced Settings was renamed Stream Timestamps. OBS WebSocket, stream-time detection, and Set List timestamps are configured there.
- The new Audio Routing tab manages normal playback, advanced mixing, the audio driver, outputs, monitoring, and recording.