
Singing Stream Savior 2.1 User Manual
Singing Stream Savior is a Windows desktop tool for singing streams. It combines your song library, BGM, karaoke tracks, queue, lyrics, vocal processing, audio routing, and OBS output in one workflow. This manual covers version 2.1.6.1.
Recommended first-use flow
- Set your stream BGM by dragging in a local file or YouTube link, or by using the selection button. The BGM starts looping automatically.
- Add karaoke tracks to the song library by dragging in local files or YouTube links, or by using the import button.
- Edit each track’s Display title. This is the name shown in Reserve and the OBS set list.
- Add songs to Reserve when you want the overlay to show what is coming next.
- Open Playlist Appearance, choose a theme while watching its automatic preview, then drag Drag to OBS into OBS.
- Return to Live Controls and double-click a song in the library or Reserve to start singing. The BGM pauses and resumes automatically.
- If lyric search opens during playback, choose synchronized lyrics whose duration and artist match the track.
- Open the Lyrics tab to adjust the display or manage lyrics manually, then drag Drag to OBS into OBS to show synchronized lyrics.
You do not need to configure the interface language or project/media folder locations first, and you do not need to create a test Reserve list. Reserve, cover art, lyrics, and OBS WebSocket can all be set up later when your stream needs them.
Japanese furigana and romaji are generated from an offline dictionary. They are reading aids and may differ from the singer’s pronunciation.
01 · Getting started
FIRST LAUNCH
Play and save your first song in 5 minutes
Follow these steps to open the app, set a looping BGM, test one karaoke track, and save a project you can continue later.
- Extract the complete ZIPExtract it to a normal folder; do not run the app from inside the ZIP.
- Open the main appDouble-click
Singing Stream Savior.exein the outermost folder. - Create a projectChoose File > New project.
- Add your stream BGMChoose a local file or paste a YouTube link in the BGM player, or drag the file or link directly onto the player. It starts looping automatically after it loads.
- Add and play one songDrag a local audio file or single YouTube link into the song table, then double-click the song.
- Save the projectChoose File > Save and create a
.bgmsprojfile.
You are done when: the BGM has loaded and loops automatically; double-clicking the song shows its title and progress in the karaoke player and pauses the BGM. After you save the project, the * disappears from the window title.
Next, check audio and visuals in OBS
If you only want local playback or practice, your first setup is complete. For an OBS stream, choose normal playback or advanced mixing for audio, then check the visuals and a recording.
- Normal playback: capture BGM and accompaniment in OBS. In OBS Settings → Audio, set Desktop Audio to the device you are listening through. Play a song and check its level. This captures other desktop sounds on that device too. Reuse a working capture source if you already have one; confirm a separate microphone source if you will sing. OBS audio source guide
- Optional advanced streaming: send processed vocals and music together. For Profile vocal effects, enable Advanced Streaming Mode and follow the dedicated plug-in route for the complete Stream Mix. Then disable Desktop Audio or raw-microphone sources that capture the same signal again. Set up mixed audio output →
- Add playlist and lyric visuals. Follow the OBS visual guide to add Browser Sources. The playlist and lyrics are separate visual sources. Their presence does not replace the audio-source check above.
- Record 15 seconds and play it back. Start a test recording in OBS. Play BGM, speak while starting the accompaniment, then stop the accompaniment and confirm BGM resumes. Stop the recording and check the voice, music, transitions, and visual updates.
Extract the entire ZIP to a normal folder. In the outermost folder, double-click the Singing Stream Savior.exe with the app icon shown below. This is the only file you need to open; do not run the app inside the ZIP or look for another EXE inside the data folders.

Create a project from File > New project, add songs, then save the .bgmsproj file. A project stores songs, display titles, queue order, lyric links, theme, and display settings. Sung history belongs to the current live session and is not written to a normal project save. If the app is interrupted unexpectedly, a recovery snapshot can restore the live-session progress when you restart. An asterisk in the window title means there are unsaved changes.
Follow the first-use guide
Starting with version 2.0.2.0, the eight-step first-use guide opens automatically the first time you enter the workspace. It changes to the relevant page and highlights the area being explained without changing your project or starting playback. You can reopen it at any time from Help > First-use Guide.
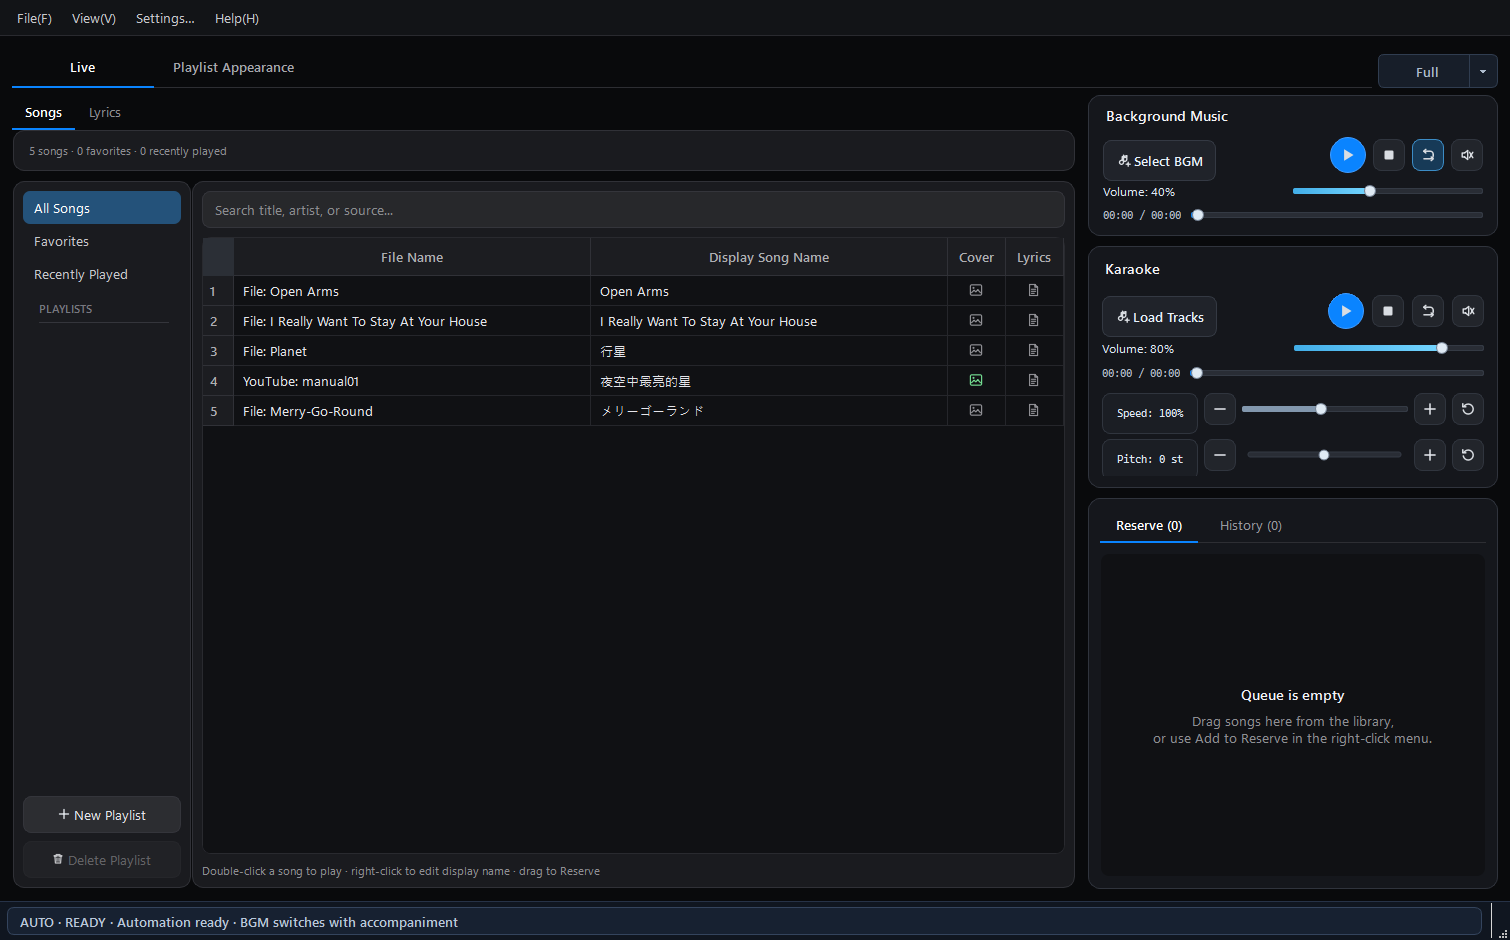
Full mode is the default preparation workspace: content and settings on the left, previews in the center, and players plus queue on the right.
02 · Library and playback
The library contains All songs, Favorites, Recently played, and removable custom playlists. Fixed collections cannot be deleted; use custom playlists to group songs by stream, genre, or event.
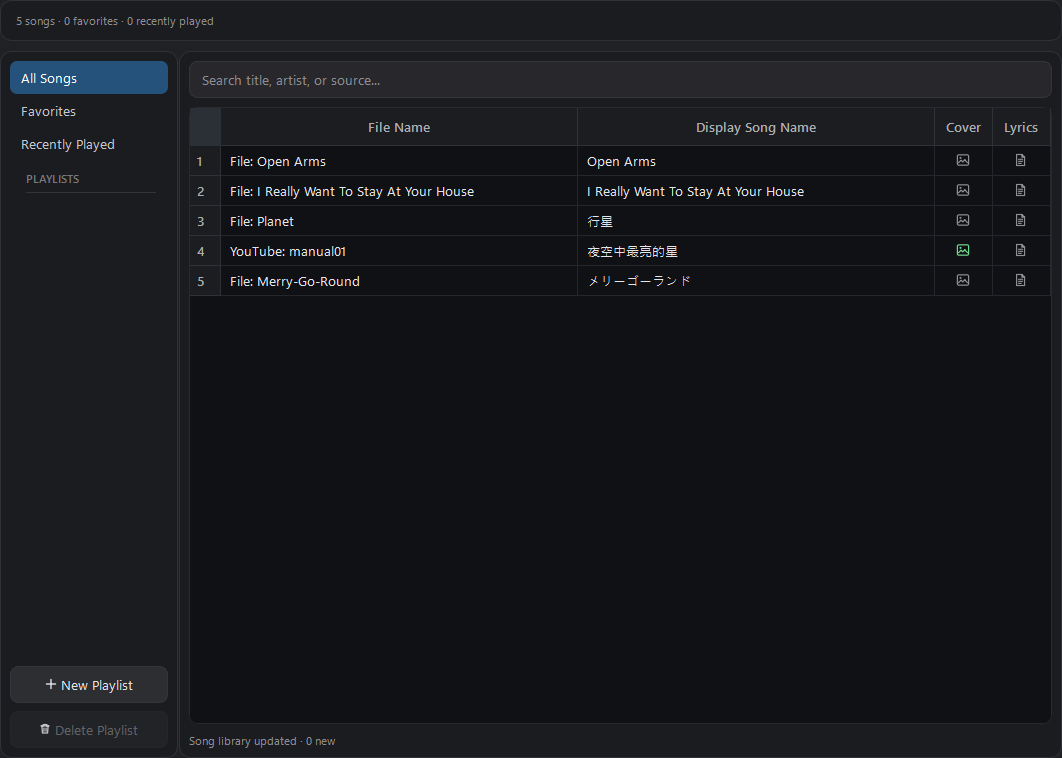
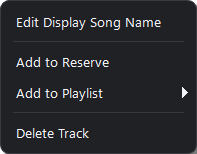
To place songs in a collection, select one or more rows, right-click, open Add to playlist, and choose Favorites or a custom playlist. This does not duplicate the audio or remove it from All songs, and one song can belong to several playlists.
In addition to choosing files from the import dialog, you can drag one or more local audio files directly into the app. Paste or drag in a single YouTube video URL to add one song. You can also drag in a YouTube playlist URL: the app recognizes its videos and imports them into a corresponding custom playlist, so you do not need to add every link individually. Supported local formats include MP3, WAV, FLAC, M4A, MP4, AAC, OGG, OPUS, and WMA. YouTube import requires an internet connection.
Audio sources and playback uses: Adding a song to the library only creates a playback item; it does not grant a music license. Check the source and its terms of use. Personal listening, audio separation, livestreaming, retaining a recording, and sharing output files may require different permissions. YouTube sources are also subject to the applicable platform terms.
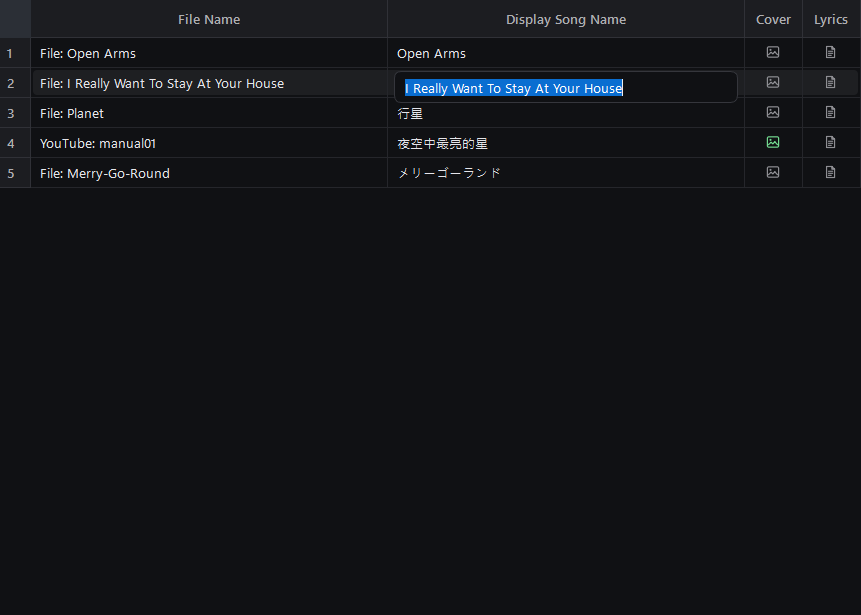
The Display title is used by Reserve, History, and OBS. If it is blank, the app falls back to the file name or YouTube title. Double-clicking a song row loads and plays it; it never opens text editing. To rename the viewer-facing title, right-click the song and choose the first item, Edit display song name. Press Enter to apply or Esc to cancel. This never renames the source audio file.
The song context menu is arranged for quick live use: Edit display song name, Add to Reserve, Add to playlist (Favorites or a custom playlist), then the delete/remove action appropriate to the selected collection.
2.0.5.0
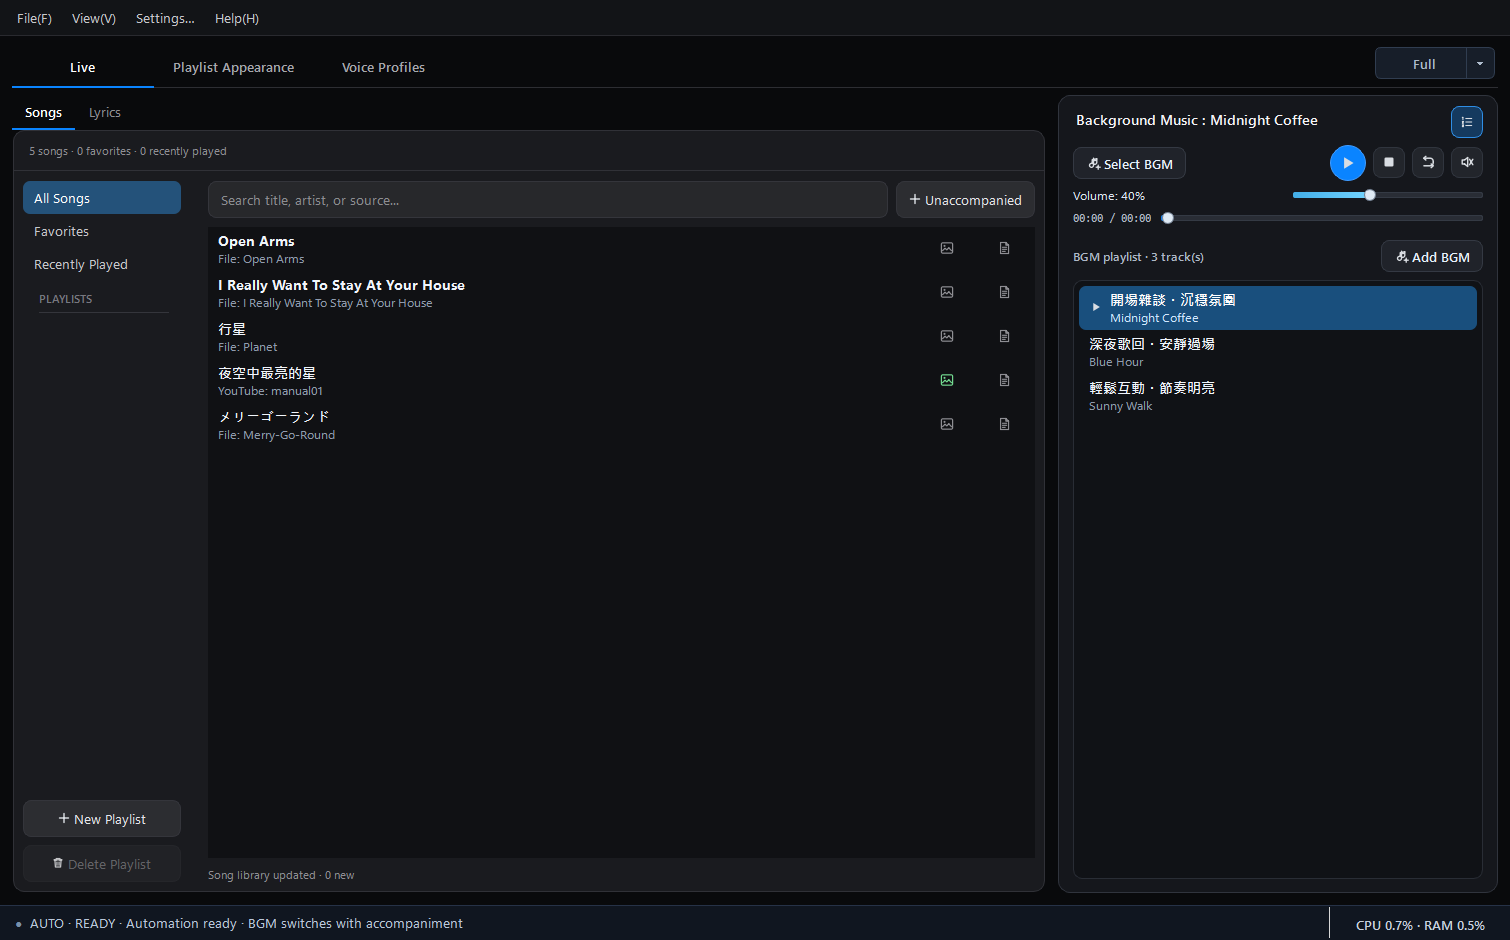
A clearer song view and a real BGM playlist
Switch the song library between the familiar table and a card view, then prepare reusable background music for different stream moods.
Song list display
The traditional table remains the default. Choose Card list under Settings → General → Song List Display when you want titles to be easier to scan. Cards keep the source, cover, and lyrics indicators; double-click plays the song, while the pencil icon edits its Display title.
BGM playlist
Keep multiple local or YouTube sources, add a note to each BGM, and drag items into order. The active track is highlighted. YouTube playlists can add either the current video or every item.
- Repeat one (default): loop the selected BGM.
- Repeat all: play in list order and continue from the beginning.
- Shuffle all: choose each next BGM randomly.
Use + Unaccompanied Performance beside the search field for a cappella, self-accompanied, or other performances without a media file. Enter the public display title, then choose manual completion or an optional planned duration. The time controls use 10-second steps and also support the mouse wheel.
Starting the item pauses BGM and updates Now Singing, Reserve, and History just like a karaoke track; stopping or completing it restores the previous BGM. These items appear in the Unaccompanied Performance smart collection, can also belong to custom playlists, and are saved with the project. No silent audio file is created.
Cover art is optional. It becomes especially useful with the Card and CD themes.
Cover-art use: Search only helps you find images. Before showing an image in a public stream or video, confirm that you have permission to use it. You can also use artwork you created or appropriately licensed artwork.
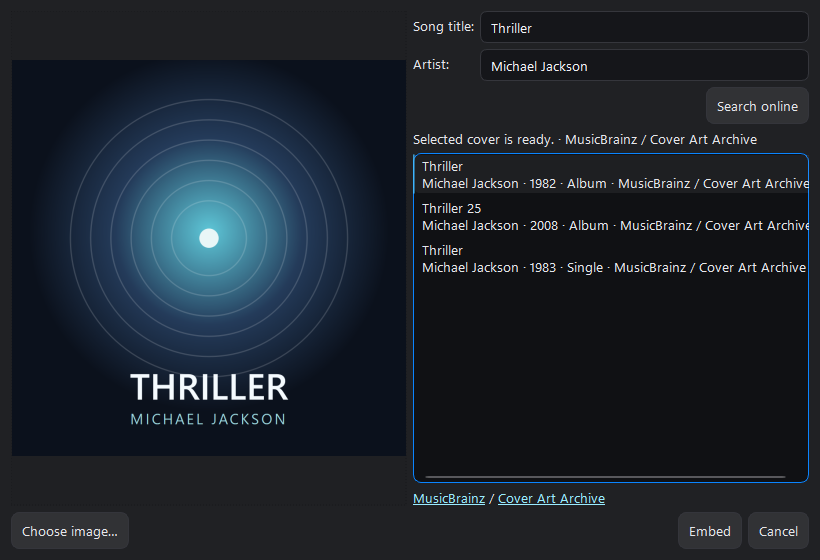
Open Embed cover from a local song’s context menu, select an online result or local image, wait for the preview to load, and choose Embed.
The BGM and karaoke players have separate play, pause, stop, loop, mute, volume, and seek controls. Karaoke playback also provides speed control and semitone key transposition—particularly useful for slowing down a difficult song, matching a comfortable practice tempo, or moving a track whose range is too high or too low without preparing another audio file.
Version 2.1 maps both BGM and karaoke volume through a more perceptual loudness curve. Local files and YouTube playback use the same slider-to-gain mapping. Existing slider numbers are preserved during the update, but the same number may sound different from an earlier version, so recheck the accompaniment-to-voice balance before the first live stream. This is a volume-control curve, not automatic loudness normalization.
The app remembers the adjusted speed and key separately for every song. When you switch away and return, that song’s preferred settings are restored; use the reset controls to return to 100% speed and 0 semitones. These adjustments affect playback only and never rewrite or reduce the quality of the source file.
The queue is optional: double-click a song in the table to play it immediately. For viewer requests or a prepared running order, drag a song from the project list or global library directly into Reserve, or use Add to Reserve. Drag queued rows to reorder them, or double-click one to start it. A song stays in Reserve when playback starts and moves to History only after it finishes naturally or you finally stop it.
The karaoke playback-mode button cycles through four choices: Play once, Repeat one, Play Reserve in order, and Shuffle Reserve. Repeat one does not add another History entry after every loop; stopping it adds the song once. Both Reserve modes move each finished song to History, keep BGM paused between songs, and restore BGM only after every queued song has played. Shuffle chooses from the songs still in Reserve, so one pass does not repeat a completed item. The same four choices are available from the Windows notification-area menu.
Pressing Play in either Reserve mode with an empty queue only shows a message and does not interrupt BGM. Double-clicking a song directly in the library automatically returns the mode to Play once. In Playlist Appearance, enable Show Reserve in OBS, then choose Next song only or a limit of 2, 3, 5, or 10. One song is labelled Next On; a multi-song list is labelled Reserve, unless the selected theme supports only one presentation. History is cleared after a normal app exit; after an unexpected interruption, the recovery snapshot can restore the queue and History for that live session.
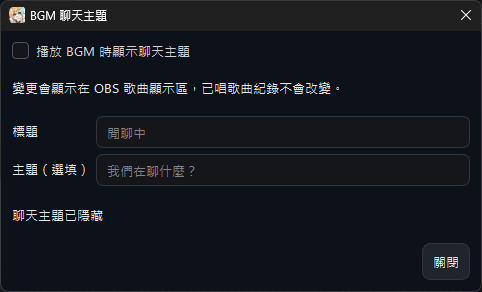
Show a chat topic while BGM plays
Select Chat topic beside the BGM playlist button. Enable Show chat topic while playing BGM, enter a heading such as “Just chatting,” and optionally add a topic. An empty heading uses the default text. Changes apply immediately and are saved with the project.
The text replaces the current-song display in the OBS playlist theme only while BGM is playing. Pausing or stopping BGM hides it; an actively playing karaoke track or an unaccompanied performance takes priority and displays its song title. Song names, the queue, and History are unchanged. Disable the option to hide chat topics.
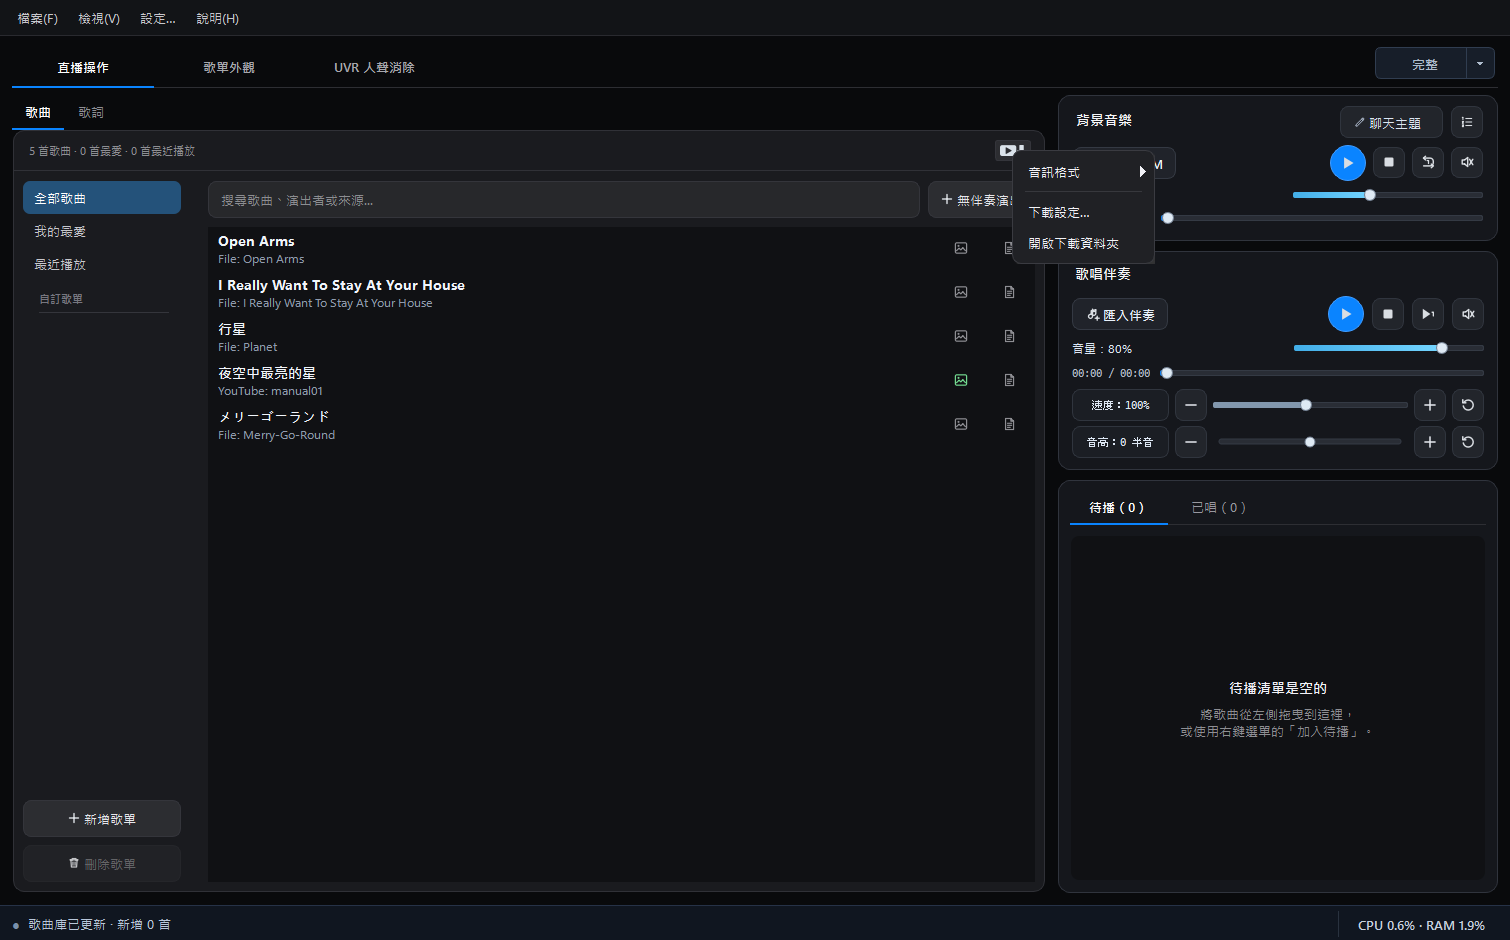
Download YouTube audio and convert existing downloads
Open or save a project, then use the YouTube download button at the right of the song statistics row. It processes YouTube audio in the current project song list, not the entire global library.
- Right-click the button and choose Audio format: MP3 · 320 kbps is the default; WAV is also available.
- The same menu opens Download settings and the download folder. Check the destination before starting.
- Click the button and confirm the count, format, and destination. The settings page also retains the batch download entry.
- Recognized audio previously downloaded by the app is converted locally when you select a different format. Files already in the target format are skipped.
Original audio is kept and same-name outputs are not overwritten. Project links change only after all operations succeed. 320 kbps is the MP3 encoding setting; WAV takes more space and helps editing compatibility, but cannot restore quality already lost in the source. Library update messages appear in the main status bar.
03 · Lyrics
Lyrics are optional. They can be used in a movable host-only Lyrics window, as an OBS lyric overlay for viewers, or both. Supported sources include LRC, SRT, VTT, plain text, YouTube captions, and LRCLIB.
If no search result is suitable, do not attach one just to continue. Paste prepared lyrics into the Lyrics Editor, or import an LRC, SRT, VTT, or text file and mark the timing yourself.
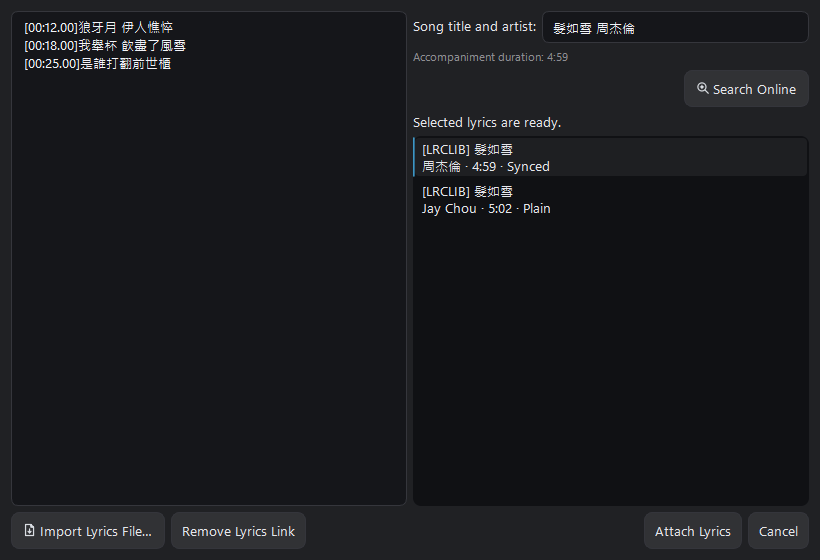
Open Manage lyrics… from the song’s Lyrics page, or click that song’s icon in the Lyrics column of the song list. Either route opens the same window, where you can search online, import a local lyric file, attach a result, or unlink the current lyrics. Search combines LRCLIB results and YouTube captions, returns up to 50 candidates, and prioritizes synchronized lyrics, language, duration, and artist information. If YouTube temporarily rate-limits caption downloads, other candidates remain available and the dialog explains that you can retry later.
Lyrics sources and permissions: LRCLIB, YouTube captions, and other search sources help you find lyrics; they do not grant permission to use them. Before use, check the lyric source, relevant rights, and service terms.
Lyrics Window
In Full mode, find the accompaniment player on the right, below BGM. Both window buttons are fixed at the top-right of the accompaniment player's title row. You do not need to switch to the Lyrics page to find them.
1 · Lyrics Window (left icon)
Select the text-window icon on the left to open the movable Lyrics Window for your own reading. Import or attach lyrics to the song first, then play the accompaniment to follow along. You do not need to add it to OBS. The song list's Lyrics-column icon instead opens lyric management; it is a different entry point.
Both buttons remain available in Full, Compact and Mini modes, including while you use another page. If the expanded BGM playlist hides the accompaniment area, collapse that playlist first.
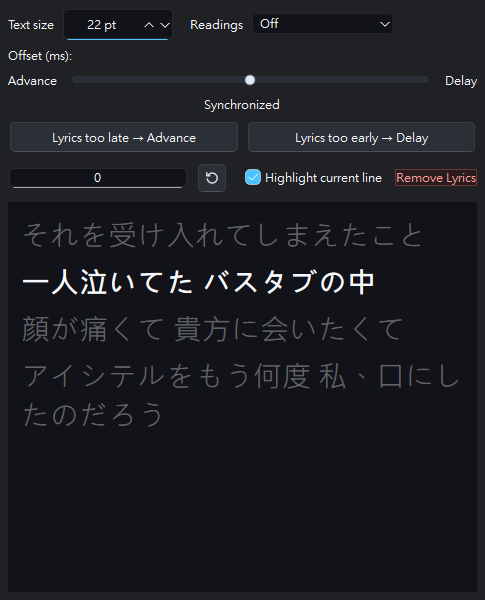
Move this window to a comfortable reading position and adjust its own text size and Japanese/Korean reading options. Select a timestamped lyric line to seek the accompaniment to that line; plain-text lyrics have no seek positions. Returning the song to the beginning also scrolls the list back to the top.
YouTube Video
2 · YouTube Video (right icon)
Select the video icon with the play triangle on the right to open the current YouTube accompaniment in a separate video window. It has a corresponding video only for YouTube links, not local audio tracks. The video stays muted; accompaniment audio still comes from the player. Available captions can be selected below the video. This button does not import a YouTube link.
Lyrics Preview and OBS
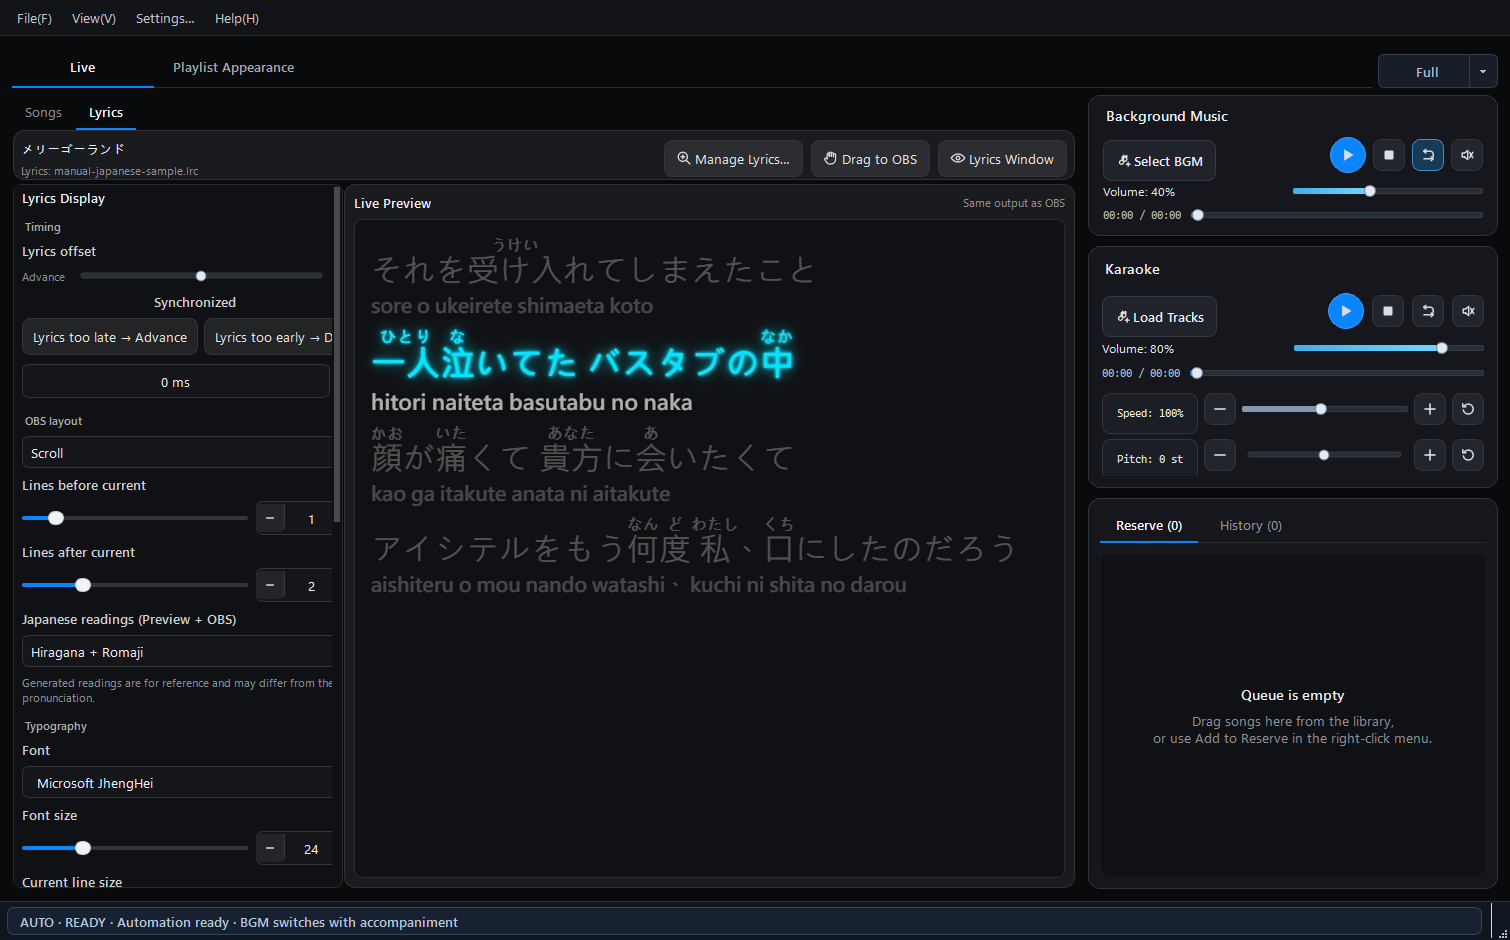
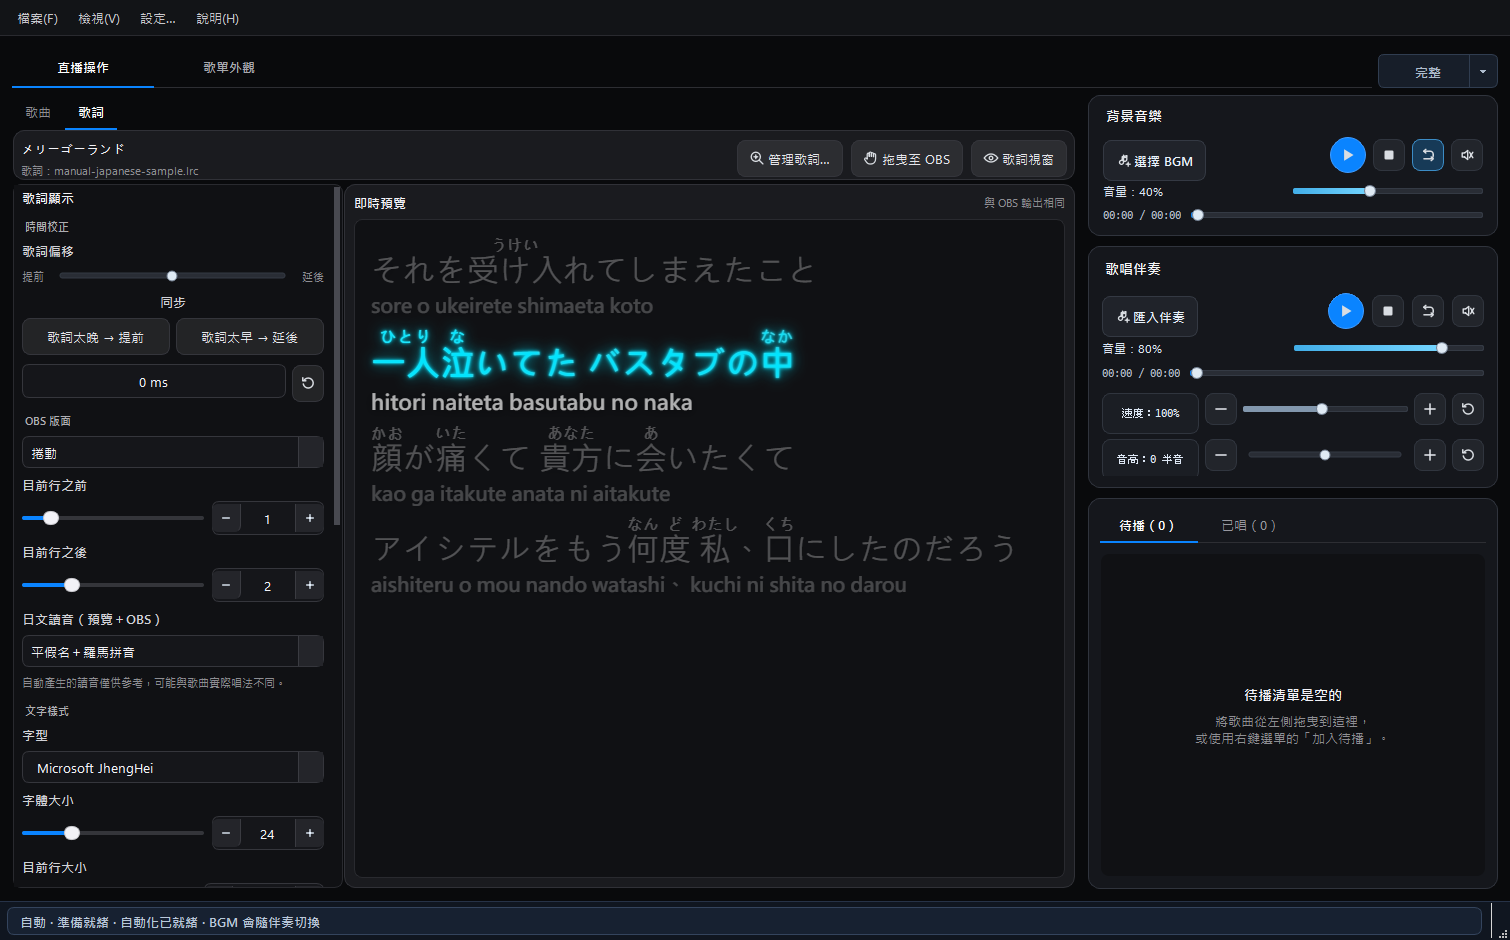
The embedded preview uses the same layout, font, color, highlight, and reading option as OBS. The independent Lyrics window has its own reading option. Available Japanese readings are off, small hiragana above kanji, word-spaced romaji below the original line, or hiragana and romaji together. Korean lyrics can show romanization with readable spaces between words. The main preview, Lyrics window, and OBS share the same preloaded background reading service so results remain consistent.
Japanese readings are generated locally by the bundled offline analyzer, so lyrics do not need to be uploaded.
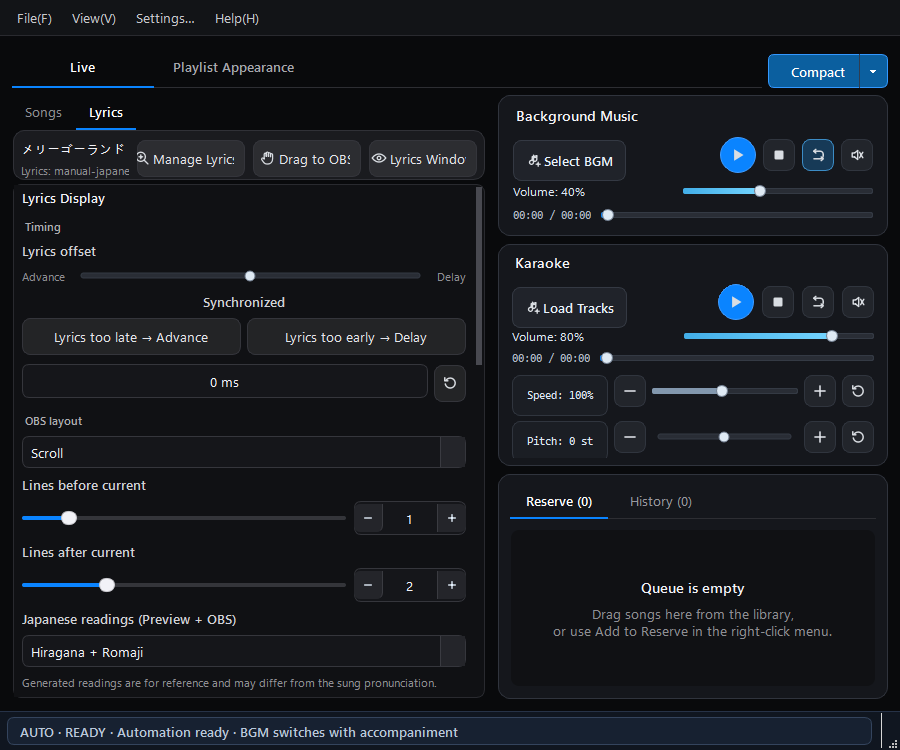
If the lyrics are out of sync, you do not need to work out positive or negative values. Choose Lyrics too late → Earlier when the sung line has already started but the lyric has not appeared, or Lyrics too early → Later when the lyric appears before it is sung. The center of the slider is synchronized; drag left for earlier or right for later, and use the reset icon to return to 0 ms.
The numbers of lines shown before and after the current line can be adjusted separately with a slider or value field. Near the beginning or end of a song, fewer lines may be available than the selected setting. Offset changes are reflected immediately in the preview, independent Lyrics window, and OBS lyric data, even while playback is paused.
Before showing lyrics publicly: Search results and import tools do not grant permission to use lyrics. Confirm that you may show the lyrics in a stream or video; permission to use an accompaniment does not by itself include public display of the lyric text.
To show lyrics to viewers, open the Lyrics tab and drag Drag to OBS into OBS. If dragging is unavailable, click the same button to copy the Browser Source path and add it to OBS.
Lyrics usage reminder
Singing Stream Savior provides tools to import, edit, synchronize, and display lyrics. It does not grant permission to use lyrics from third-party songs. Whether lyrics may be displayed in a public livestream, video, or other use must still be checked against the work’s license, platform rules, and applicable law.
Nine animated lyrics styles and card previews
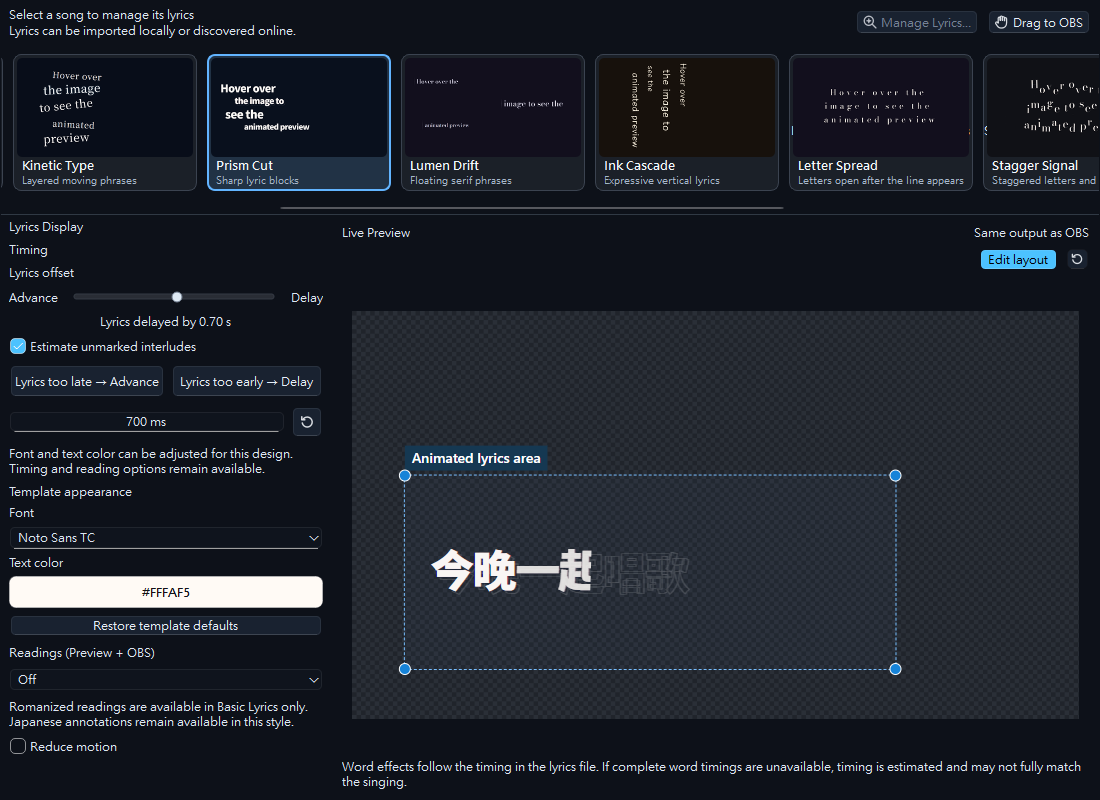
Open Live Controls → Lyrics to choose a style. Alongside Basic Lyrics, Classic Karaoke, and Vertical Verse, nine animated styles offer moving card previews and a description beneath each name.
- Kinetic Type: layered moving phrases; Prism Cut: sharp lyric blocks.
- Lumen Drift: floating serif phrases; Ink Cascade: expressive vertical lyrics.
- Silk Script: flowing serif phrases; Verse Stack: stepped lyric hierarchy; Glyph Motion: bold spatial word groups.
- Letter Spread: the complete lyric line appears first, then its letters spread gently from the center; Stagger Signal: letters settle at varied heights with brief, bounded signal jitter and noise.
- Word effects follow the timing in the lyrics file. If complete word timings are unavailable, timing is estimated and may not fully match the singing.
- Attach timestamped lyrics and play the accompaniment to check actual entrances, transitions, and synchronization.
- Choose Edit layout. Drag a block to move it or any of its four corner handles to resize proportionally; blocks can extend beyond the canvas edges.
- An OBS source already using this lyric output updates while you drag. Exit editing and save the project to retain the layout.
The canvas remains 1920 × 1080. For Japanese or Korean romanization in the OBS lyrics output, choose Basic Lyrics; the independent Lyrics window retains its own reading settings.
Move and resize lyric blocks in the preview
In 2.1.3.2, Basic Lyrics, Classic Karaoke, and Vertical Verse support layout editing. Open Live Controls → Lyrics, choose a style, and select Edit layout above the preview. Drag inside a lyric block to move it; drag a corner handle to resize it proportionally. The canvas stays 1920 × 1080 (16:9).
An OBS lyric source already using this output updates while you drag; releasing the mouse or adding the source again is unnecessary. Center guides help alignment. Select Edit layout again or leave the page to exit editing without losing the position. The adjacent reset icon restores the layout. Save the project to retain changes. The checkerboard represents transparency and is not sent to OBS; the independent Lyrics window is unaffected.
04 · Lyrics editor
If search does not find a suitable lyrics file, use the editor to add timing to lyrics you have prepared.
- Select a song in the song list.
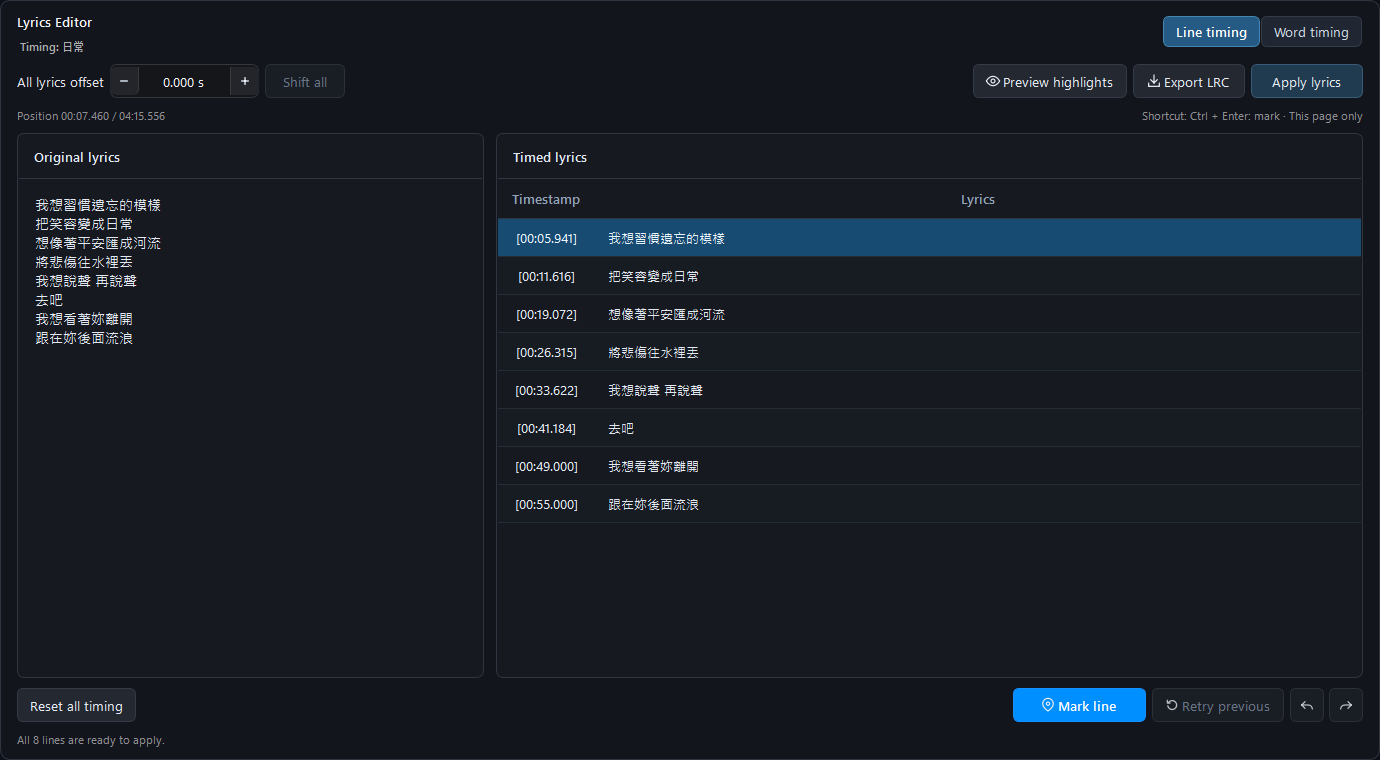
- Open Live → Lyrics Editor and paste the lyrics on the left, one phrase per line. Linked lyrics load automatically for editing.
- Choose Line timing and play the accompaniment using the player on the right. Press Ctrl + Enter or the mark button at each line start. The shortcut is recommended; you can slow playback to make marking easier.
- Turn on Preview highlights to check the result. For finer timing, switch to Word timing and mark each word as you listen.
- Select Apply lyrics to save and link the lyrics to the song, then save the project.
Select, merge, or split words
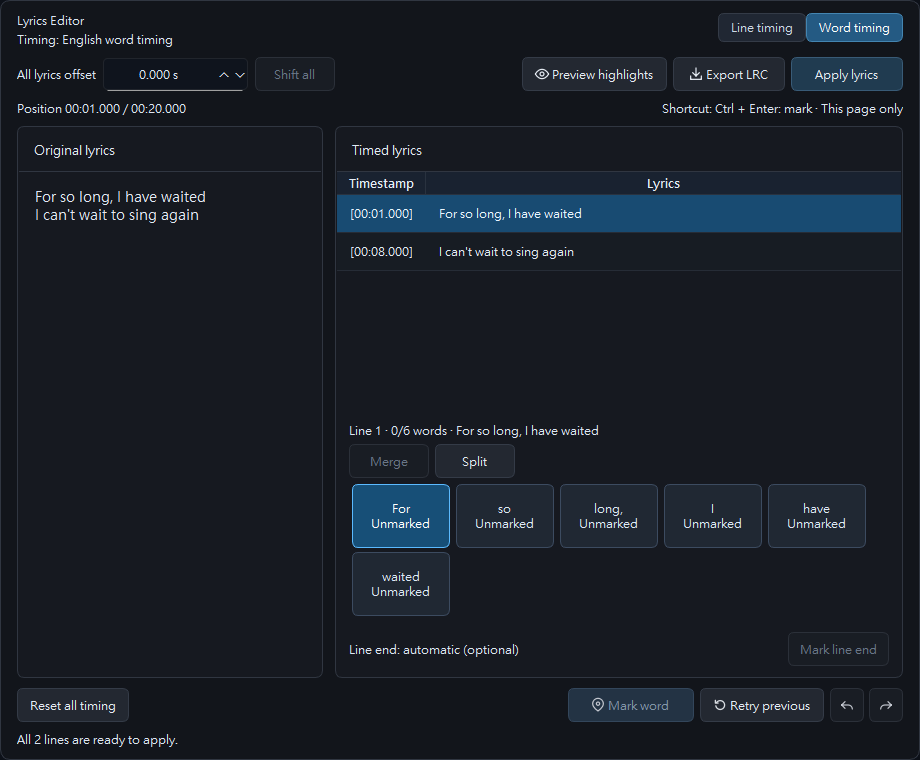
English starts with whole-word buttons, Korean uses space-separated groups, and Chinese and Japanese start with individual characters. Marking advances to the next word and then the next line.
- Ctrl-click adds or removes individual selections.
- Select the first unit, then Shift-click the last to select the whole range.
- Select adjacent units and choose Merge to combine them. Their individual timings are retained.
- Select a word and choose Split to separate its characters. Existing individual timings are restored; characters without a recorded start stay unmarked for you to finish.
Use Undo, Redo, or Retry previous to correct a mark. Preview works before every line is complete, and clicking a recorded timestamp seeks back to it. Blank lines can mark instrumental breaks. Ctrl + Enter only acts on this page.
All lyrics offset moves every mark by up to ±20 seconds. Apply lyrics saves to the shared lyrics folder, configurable under Settings → Files & Project; Export LRC lets you choose another location. If you change playback speed while editing, leaving the page asks whether to restore the speed from when you entered.
05 · Playlist appearance and OBS
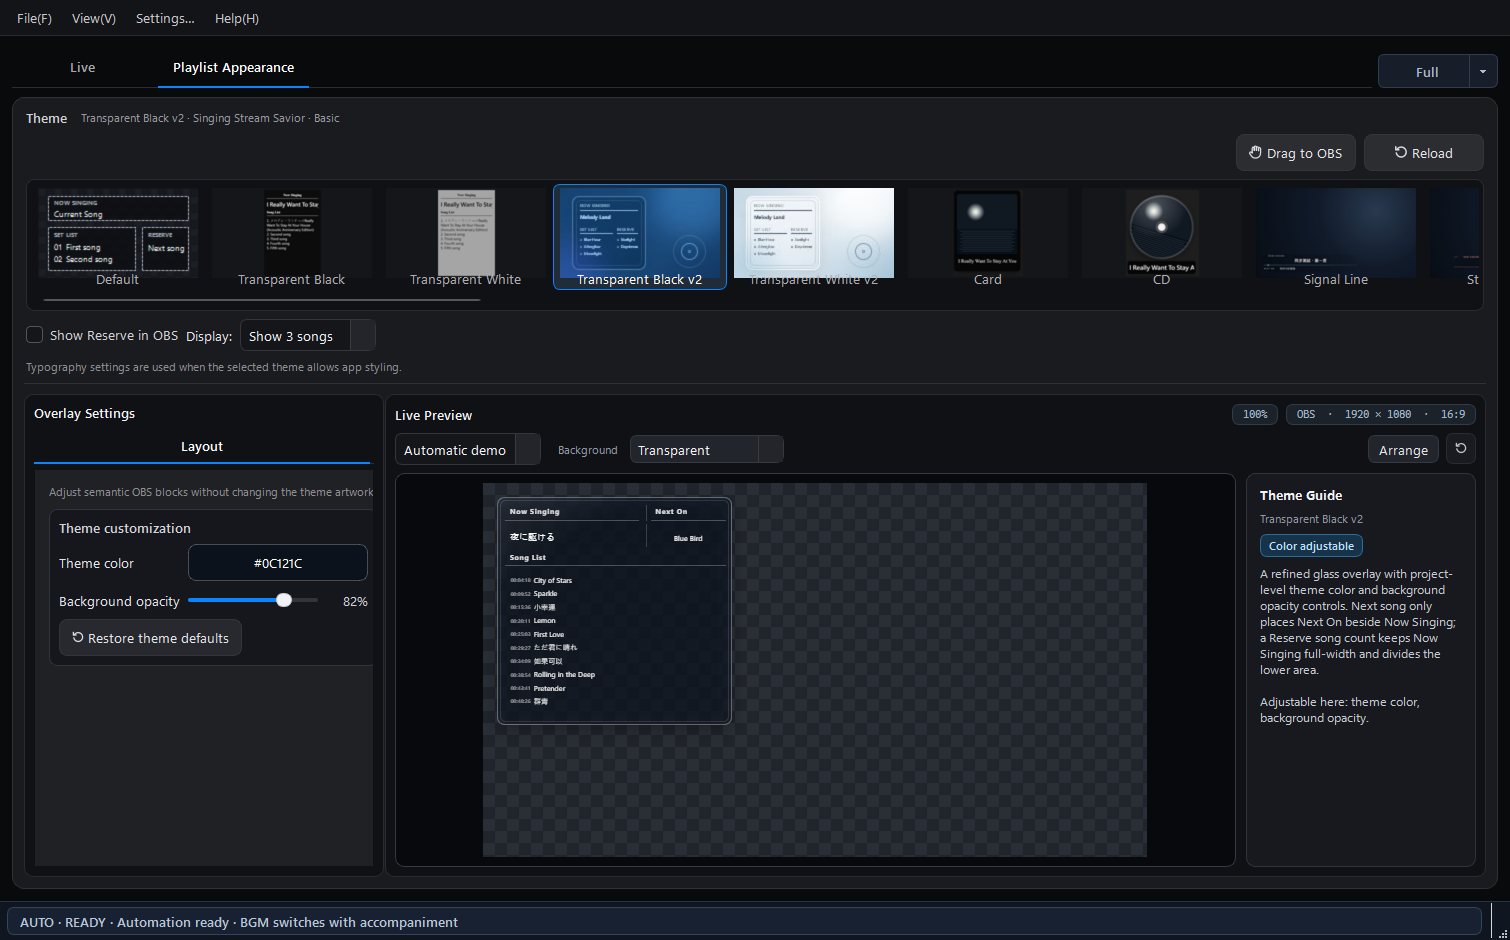
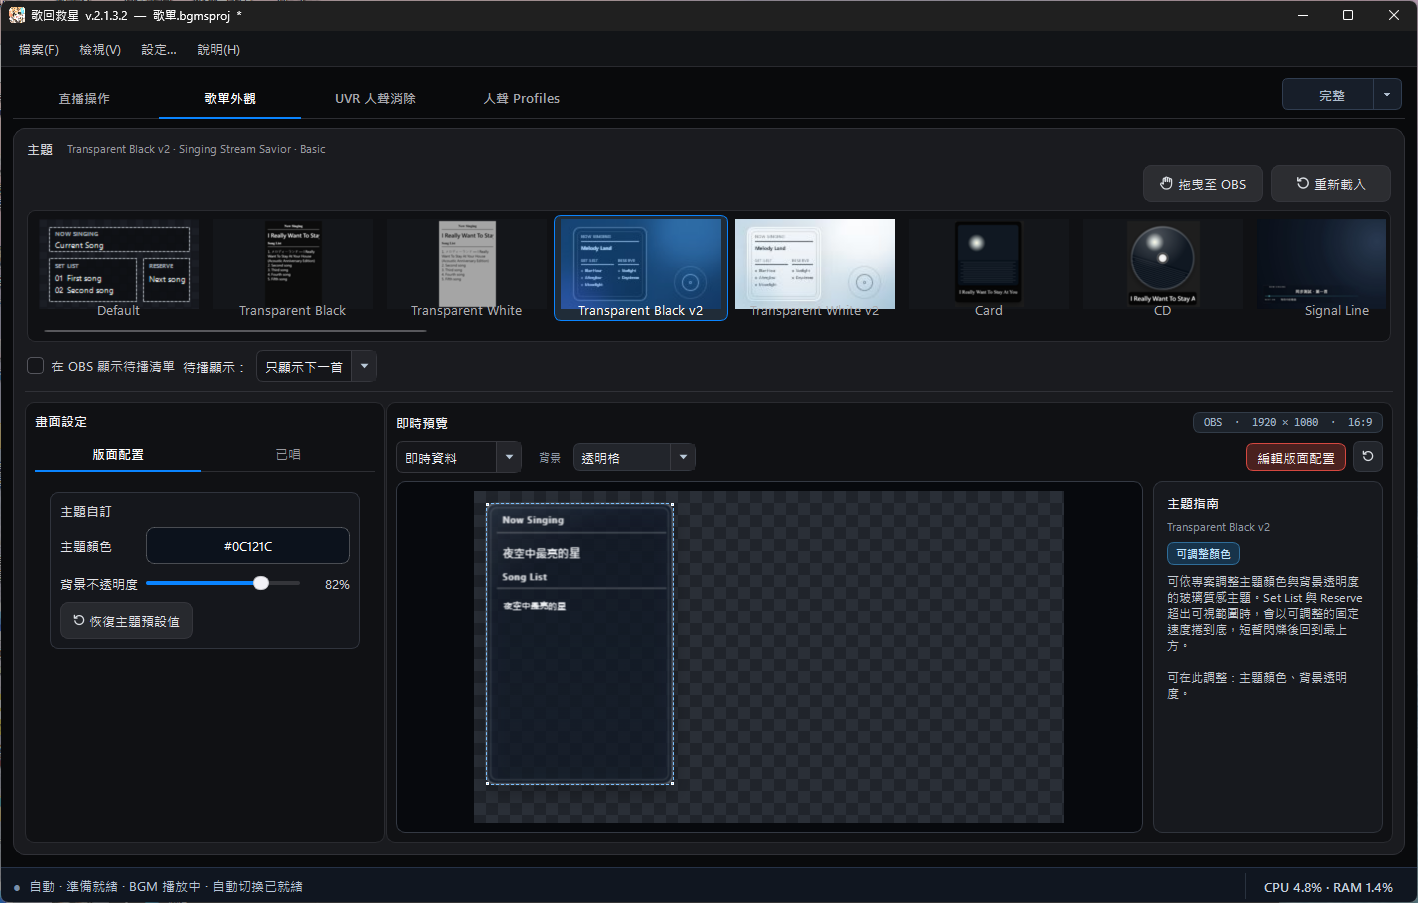
Under Playlist Appearance, select a theme card and inspect Now Singing, Set List, Next On, and Reserve in the preview. Basic themes appear first: Default, Transparent Black, Transparent White, Transparent Black v2, Transparent White v2, Card, CD, Signal Line, and Stage Caption; illustrated themes follow.
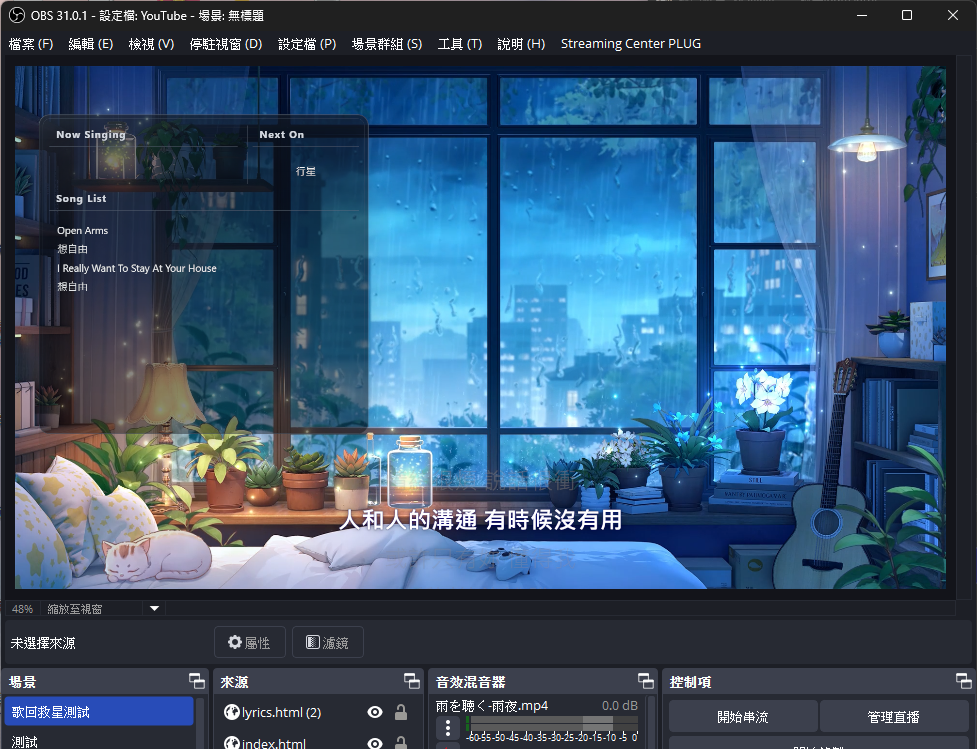
Card places cover art in a vertical card; CD crops it into a disc. Cover art is not required for playback or other themes. Hold and drag Drag to OBS to create a local Browser Source directly. If OBS does not accept a drop while streaming, click the same button to copy the source path, add an OBS Browser Source, paste it into the URL field, and set the size to 1920 × 1080. Do not enable Local file. Neither method requires OBS WebSocket.
The theme canvas does not restrict how the Browser Source must be used. In OBS, freely resize, crop, and position it to fit your own stream layout. Default is especially suitable as a flexible base: use the dashed text-area guides in the preview to crop out the Now Singing, Set List, or other blocks you want, then place them over your own background. Transparent and illustrated themes may be kept as a complete composition or cropped to selected parts. OBS cropping changes only that scene source; it does not modify the theme or song data.
Layout is the leftmost appearance tab. The app reads each theme’s declared capabilities and shows only controls that actually work with that theme.
| Tab | Controls |
|---|---|
| Layout | Theme color, background opacity, or optional project block positions when supported; restore the theme defaults at any time |
| Current | Now Singing font, size, color, bold/italic/underline, alignment, and long-title marquee speed |
| History | Set List font, size, color, numbering style (Off, 1., 01, or .), bold/italic/underline, alignment, and list scroll speed |
| Reserve | Separate Reserve/Next On font, size, color, numbering style (Off, 1., 01, or .), text style, and alignment |
You can also enable Reserve, choose Next song only or a 2-, 3-, 5-, or 10-song display limit, and—when OBS WebSocket is enabled—show timestamps before sung songs in supported Set Lists. Timestamps are not added to Reserve or Next On.
Default starts with a white preview background; transparent and illustrated themes can use the checkerboard to inspect transparency. Preview backgrounds can also be dark, light, a custom color, or an image with fit/fill/stretch. Only these backgrounds stay inside the app; positions and sizes changed with Edit layout are synchronized to OBS. Unsupported controls are hidden rather than merely disabled. Default exposes the broadest typography and layout controls; legacy Transparent Black/White retain Current and History typography controls; both v2 themes, Signal Line, and Stage Caption expose their supported color/opacity controls.
Animated previews and live OBS layout updates
Playlist theme cards now preview motion. Compare the cards, then check the selected theme in the central preview. Auto demo cycles sample states locally; its sample songs are not sent to OBS.
- New themes include Signal Veil, Signal Tide, Cue Line, Margin Set, Oblique Plate, and Oblique Stream. Signal Veil and Signal Tide use actual playback audio to animate waveforms and light points. Oblique Stream is a minimal transparent set list with left or right placement, Now Playing above or below, timestamps, and curved scrolling.
- Use Edit layout to move and resize the playlist. The same source already added to OBS updates as you drag. Fixed-design themes allow overall placement and scale; internal font and color options depend on the theme.
- Preview checkerboards, colors, and background images are local viewing aids. Playlist and lyric overlays are separate OBS sources and can be arranged independently.
After an upgrade, check the theme cards in Playlist appearance and use Reload to refresh the list. Save the project to retain layout changes.
Move and resize the playlist in the preview
In Playlist Appearance, choose a theme and select Edit layout above the preview. Drag inside the theme outline to move it, or drag a corner handle to scale it proportionally within the fixed 1920 × 1080 (16:9) canvas. An existing OBS source using the same output updates during dragging, so you can check the stream layout as you edit.
Center guides assist alignment. Select the button again or leave the page to finish; the placement remains. Use the adjacent reset icon to restore the layout and save the project to retain your settings. Fixed-design themes can also be moved and scaled as a whole; their internal font, color, and arrangement options still depend on the theme.
08 · Livestream timestamp capture
OBS WebSocket is optional and disabled by default. Its primary purpose is to read the live OBS timer, record when a karaoke track starts, and show timestamps before songs in supported Set Lists. Normal set-list and lyric overlays work without it.
In OBS Studio 28 or later, open Tools > WebSocket Server Settings, enable the server, keep port 4455 unless you changed it, and copy the password. Close the connection-information window, then choose OK to save and close the settings. In Singing Stream Savior, open Settings > Stream Timestamps, enable OBS WebSocket, enter 127.0.0.1, the matching port and password, then choose Connect. Treat the OBS password as a local connection credential and do not publish screenshots that reveal it.
The status indicator appears at the lower-right only when enabled: green means connected, yellow means connecting/reconnecting, and red means disconnected. Test timestamps with a private test stream before relying on them live.
09 · UVR vocal removal
Why vocal separation is included
Preparing music for singing or practice often means moving between tools to convert files, separate tracks, and organize the results again. Singing Stream Savior brings those steps together to reduce repetitive work when you process material you have the right to use.
Before you begin, check how the material may be used.
Use material that you have the relevant rights to obtain and process, material licensed for audio separation, or material you may otherwise use under applicable law. Buying an audio file, being able to play it online, or receiving it from someone else does not by itself permit separation, livestreaming, uploading, or distribution.
This feature does not provide a music license. Separated results may still contain protected compositions and recordings. Before public use, confirm that your permission covers the intended use. When using a YouTube source, also follow the applicable platform terms.
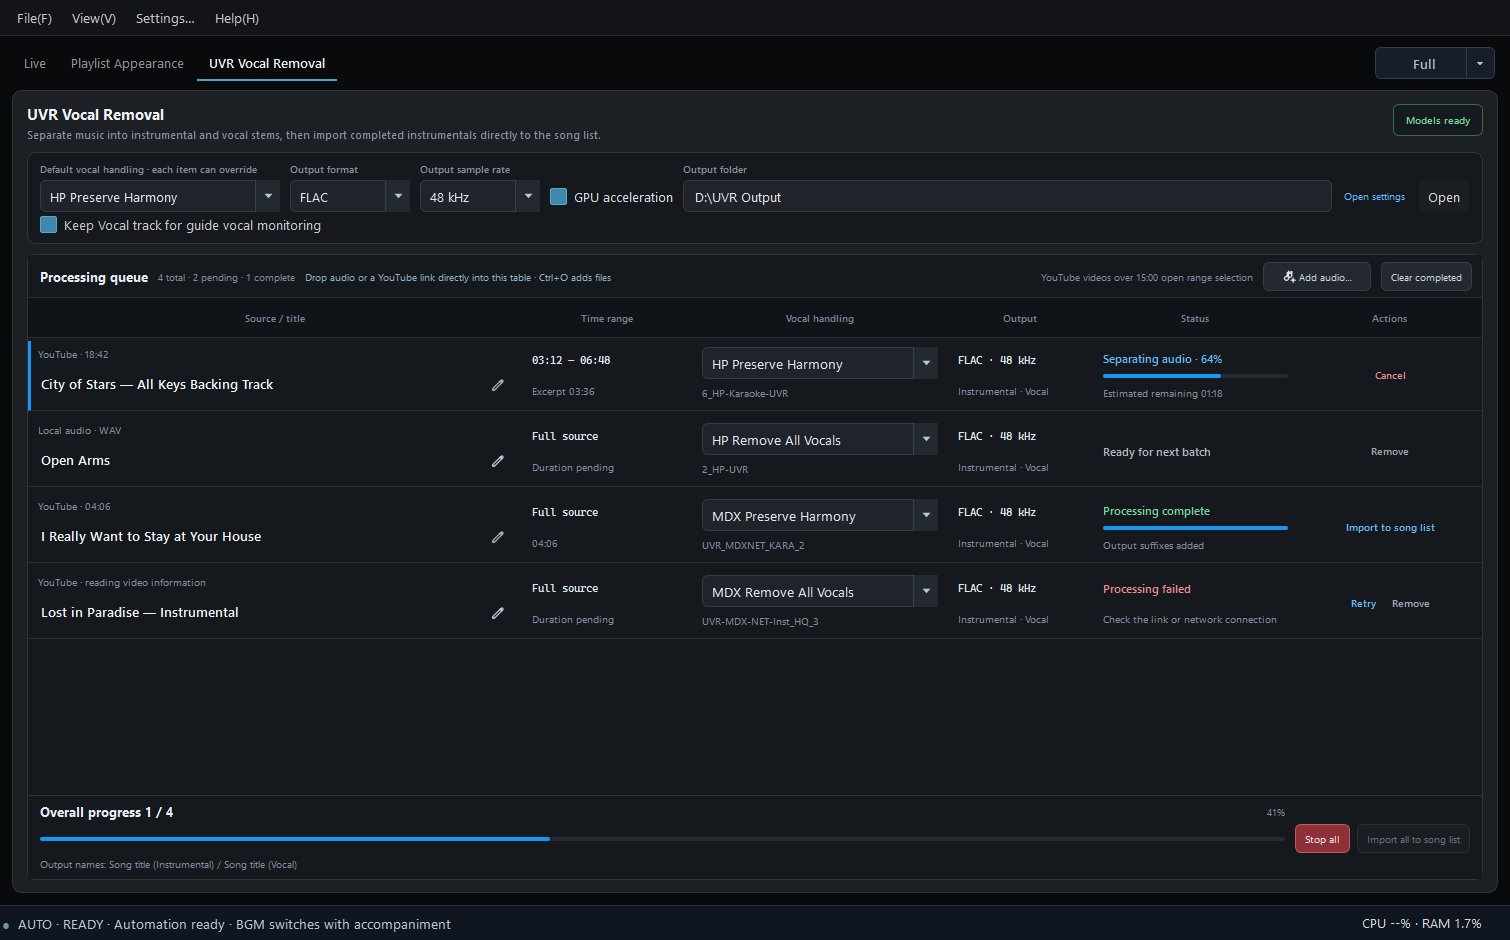
UVR arrived in 2.1.1; HP and MP3 are new in 2.1.2. Drag audio files or YouTube links into the processing queue. YouTube titles are detected automatically; videos over 15 minutes can be trimmed before processing. For each song, choose HP or MDX and Preserve Harmony or Remove All Vocals. New installations default to HP Preserve Harmony; your chosen default is remembered. Click the pencil to edit a title. Batch settings are locked after Start, and processing continues while minimized.
Choose WAV, FLAC, or MP3 (320 kbps), and either 48 kHz (default) or 44.1 kHz. GPU acceleration uses a compatible GPU when available; otherwise it falls back to CPU and reports the change in the lower-left message area. Manage the output folder under Settings > Files & Project.
Noon personally recommends HP for better preservation of accompaniment detail, based on listening tests; results vary by song and genre. Under the same test conditions, HP was slower than MDX. Actual speed depends on the song and computer.
Guide vocal monitoring
Enable Keep Vocal track for guide vocal monitoring in UVR before processing. When you import the finished accompaniment, its matching Vocal track is linked automatically. Without this option, only the Instrumental output is saved. You can import one completed song or all completed songs.
The accompaniment player shows a guide vocal icon only for supported paired tracks. Turn it on to hear the guide through monitoring; it is never included in the Stream or OBS mix. Use Meter or the icon’s context menu to adjust its volume or mute it. It follows the accompaniment’s Key, speed, seeking, and loops, and turns off when you change songs.
For material you have confirmed may be used in a livestream, process it ahead of time when possible. Vocal separation uses CPU or GPU resources. Before running it during a stream, confirm that the computer still has enough capacity for audio and OBS.
10 · Workspace modes
Use the top-right mode button or Ctrl + Shift + M:
- Full: all library fields, lyric/theme previews, and settings. Best for preparation.
- Compact: keeps song selection, players, Reserve, and History while hiding wide source columns and large previews.
- Mini: best when the songs and stream visuals are already prepared before going live. It hides the library and BGM player, leaving the karaoke controls, Reserve, and History; the Lyrics Window and YouTube buttons remain in the accompaniment player. Choose the next song directly from the prepared Reserve list. The separate Lyrics Window can be moved and its text size adjusted to fit around other streaming tools.
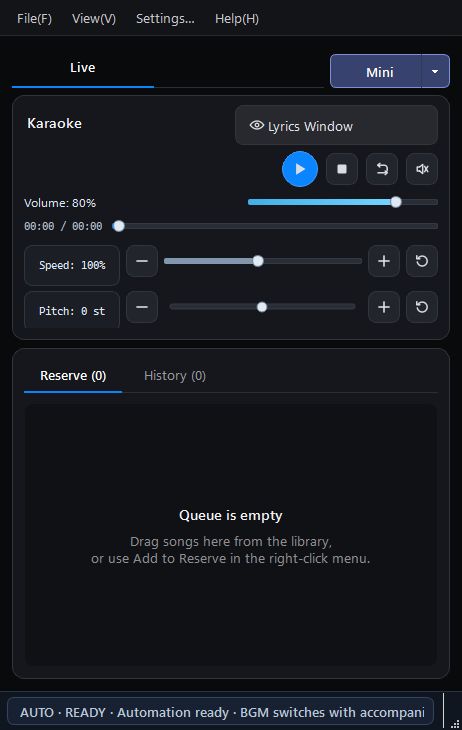
At each startup, Full mode opens at 1920 × 1080; if the available space is smaller, the window starts reduced to fit the screen. After it opens, you can resize it freely; the window is not locked. Switching modes only changes which controls are visible. A song already playing continues, and the existing queue order and OBS scene are not reset. Each mode remembers its window size and layout.
When the main window is not needed, its close button can minimize Singing Stream Savior to the Windows notification area instead of exiting. Playback continues in the background, while the tray menu and global shortcuts keep playback, Key, speed, Profile, microphone, Lyrics Window, and Meter controls available. Use Exit Application in the tray menu to close the app completely.
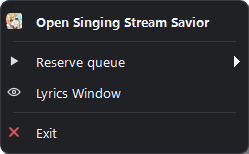
11 · Settings and troubleshooting
No sound locally, in OBS, or for viewers
- Play a song you know has audio. Check playback progress, volume, mute, and the active Windows playback device.
- If you can hear it but OBS cannot, check its audio source. Normal playback uses desktop capture; advanced streaming needs matching Stream Output and OBS sources. Monitor is your listening path, not Stream Output.
- If only vocals are missing, check microphone input and mute. In advanced mode, inspect both Vocal and Master / Stream Output in the Meter.
Check OBS capture and make a short recording →
Doubled vocals, echo, or feedback
- With a complete Stream Mix, disable any duplicate raw-microphone source in OBS. Check whether Desktop Audio also captures the same mix.
- Use headphones for microphone monitoring so speakers do not feed back into the microphone.
- Select physical headphones or an audio interface for Monitor Output, not the same CABLE Input used to send audio to OBS or Discord.
Check monitoring and stream output paths →
Distortion, dropouts, or uneven volume
- Check player and Meter levels. If a source remains near overload, lower its volume and make another test recording.
- For repeated dropouts or a yellow stability state, stop OBS streaming, Discord calls, and external recording before running the App Buffer stability check.
- Apply the recommended value and retest. Do not force an unverified low Buffer. A single yellow warning or cumulative counter cannot establish an audible glitch on its own.
Read about Buffer checks and starting settings →
Delayed headphone vocals or out-of-sync recordings
- Play back an OBS test recording to separate a headphone-only delay from a delay in the audience output.
- For headphone-only delay, check the Monitor route. If your audio interface offers Direct Monitor, hardware monitoring can reduce singing latency.
- If the recording is also out of sync, confirm a single Stream Output capture route and check devices and Buffer using the stability guide. Changing headphone-monitor volume does not correct stream timing.
Understand monitoring and recording timelines →
After each change: Record and replay the same test song; for Discord, have the receiving side confirm voice and accompaniment. Moving meters alone do not verify level, delay, or duplicate capture.
Back up both the .bgmsproj file and local media/lyrics before moving to another computer.
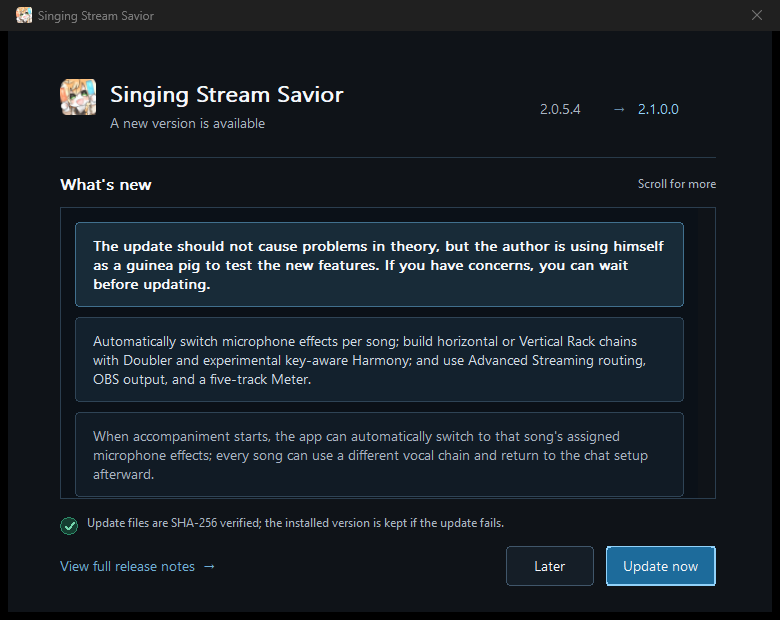
The outer Singing Stream Savior.exe uses Launcher 1.2 to check for releases. If no newer version is available, it automatically opens the verified installed app without leaving you on an empty update screen. Offline startup and a check that is not yet due also continue with the installed version.
When an update is available, the card-style prompt shows the current and target versions plus localized release notes. Later or closing the prompt starts the installed version without changing files; Update now begins the download.
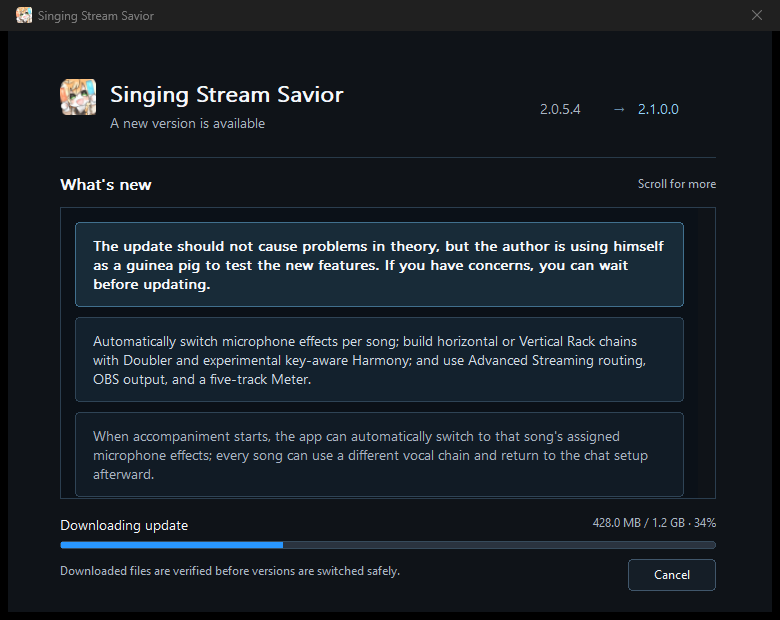
During download, select Cancel or close the window to keep using the installed version. Closing is temporarily disabled during the final installation stage. If the update is unexpectedly interrupted, the launcher repairs or completes it the next time it starts.
Keep the outer launcher and all files inside the app folder in their original locations; do not move only part of the installation. If you must use an older release, extract its official complete ZIP to a separate folder and first back up the .bgmsproj and media. If updating still fails, download a fresh complete ZIP instead of mixing program files from different versions.
If the app reports that no Qt platform plug-in could be initialized, extract a fresh copy of the complete ZIP and launch only the outer Singing Stream Savior.exe. You do not need to inspect or open anything in the data folders. For desktop access, create a Windows shortcut to that outer EXE instead of moving it.
If lyrics cannot be found, shorten the search terms, check title/artist spelling, prefer synchronized results close to the track duration, or import LRC/SRT/VTT/plain text. If an OBS overlay does not update, reload the app preview and refresh the Browser Source in OBS.
The Recent Projects list automatically removes entries whose .bgmsproj file has been moved or deleted.
Advanced diagnostics: frames and audio health
Use these details for repeated dropouts, a yellow stability state, or a diagnostic report. Complete the symptom checks first, then compare counter changes with listening and a short recording.
What do incomplete / requested frames mean?
These are cumulative read counters for the current native monitoring route. One audio frame contains one sample per channel at the same instant; 48 kHz means 48,000 frames per second.
- Requested counts frames the route needs to read. An incomplete read counts the entire affected block, so it is not an exact missing-sample count or a measurement of audible dropout duration.
- The BGM / accompaniment row shows steady-state counts. Startup (approximately the first second), closing, and mode transitions are accounted for separately. Recreating the audio route resets the counters; refreshing the tooltip does not.
- Expiry events count resets caused by expired pending audio. They are separate from underrun / overrun and submitted, skipped, or late frames.
- Growing counters do not mean growing audio files or memory. During steady playback, watch whether incomplete counts keep rising and compare with listening or a short recording; a single screenshot cannot prove audible glitches.